Forums Latest Members

On My Bench - Seiko Stem Disassembly Tool - and other stuff

  1. JimInOz Melbourne Australia Jun 11, 2020

    Posts
    15,489
    Likes
    32,377
    I got sick of needing three hands to remove stem parts from Seiko (and other) spring loaded stems.

    This is the type of stem.

    StemTool1.jpg

    You need one hand to hold the crown (or a stable soft jaw vice), One hand to use strong tweezers to push the spring washer and spring down, and another hand to remove the sprung stem.

    All the time hoping the tweezers don't slip and the stem and washer vanish into the ether.

    I've been doing a few Seikos lately and got tired of holding my breath as I disassembled/assembled these little buggers.

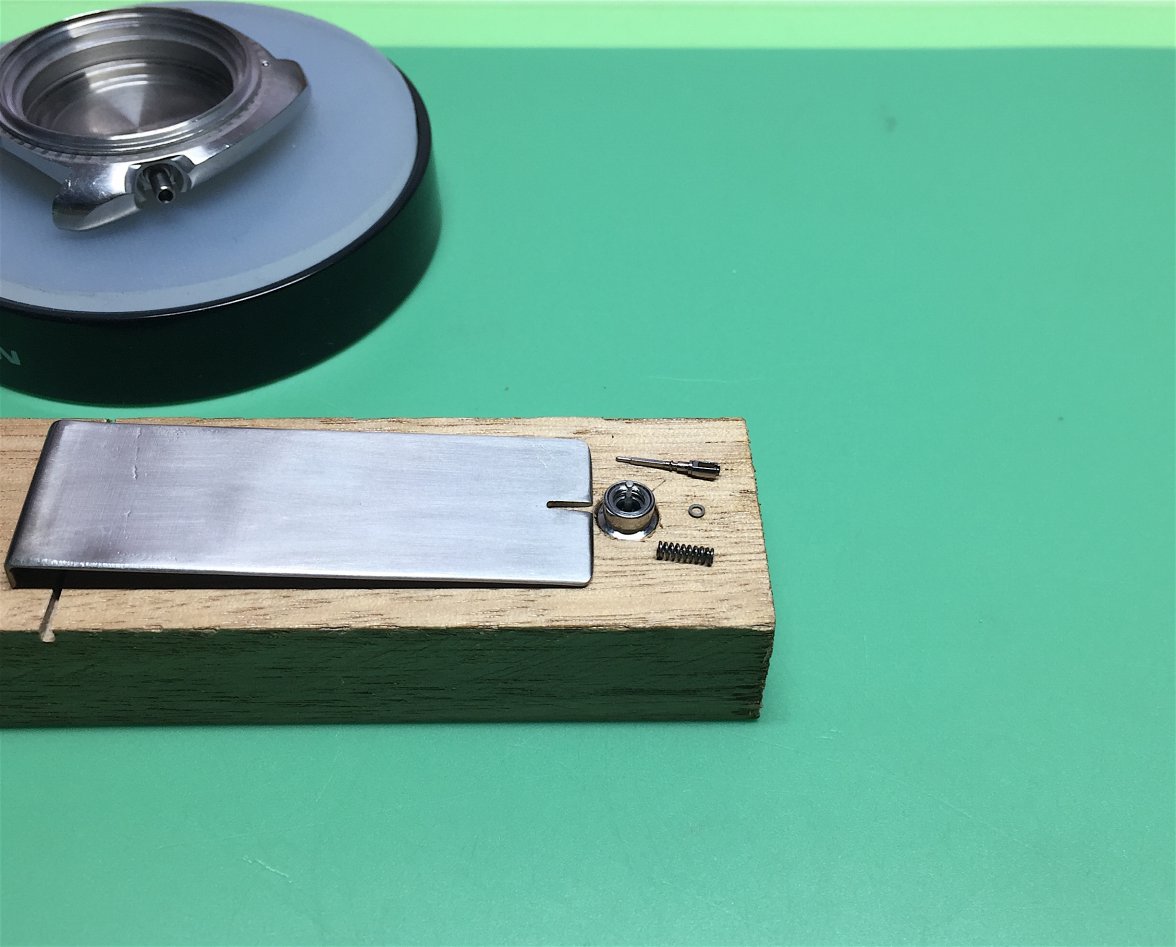
    So I made a tool. A block of Tassie Oak with a 7mm dia hole for the crown and a stainless plate with a slot to fit over the stem.

    StemTool2.JPG

    Now I just pop the unit into the tool.

    StemTool3.JPG

    Align the stem and fit the plate over the stem washer.

    StemTool4.JPG

    Press down and remove the sprung stem.


    And "Viola!", all done, easy peasy. Re-assembly is just as easy and no more flying stems and washers.
     
    StemTool5.JPG
    OmegaP99, Longbow, michael22 and 21 others like this.
  2. TDBK Jun 11, 2020

    Posts
    578
    Likes
    1,799
    Looking at the first photo without a clear sense of the scale, it seemed quite large, I was wondering why you used so much wood. Then your hand entered the image and I realized it's about the same scale as a finger. Clever!
     
    OmegaP99 likes this.
  3. CJpickup57 Jun 11, 2020

    Posts
    640
    Likes
    1,475
    Well done! It’s always a good thing when you can prevent parts from zinging across the room.
     
  4. pascs Jun 11, 2020

    Posts
    1,634
    Likes
    5,657
    Very nice idea and simple to operate. :thumbsup:
     
  5. studeb Jun 11, 2020

    Posts
    308
    Likes
    289
    That is really nice. I only learned about putting items in plastic bags to contain explosions late in life.
     
    BatDad likes this.
  6. Archer Omega Qualified Watchmaker Jun 11, 2020

    Posts
    26,462
    Likes
    65,602
    Making your own tools is a common thing in watchmaking, so good on ya Jim! :thumbsup:
     
    BatDad likes this.
  7. X350 XJR Vintage Omega Aficionado Jun 11, 2020

    Posts
    12,609
    Likes
    29,906
    As the saying goes "necessity is the mother of invention".

    Nice job.
     
  8. JimInOz Melbourne Australia Jun 24, 2020

    Posts
    15,489
    Likes
    32,377
    Just doing a pre-service check on a Miyota 82S5.

    Lack of oil isn't a problem :D.

     
  9. JimInOz Melbourne Australia Jun 25, 2020

    Posts
    15,489
    Likes
    32,377
    And here we have the lower pallet jewel. You can see how the oil has climbed up on the needle point there's so much there. Same with the upper pallet jewel, the sink was full of oil.

    LwrPalletJwlOil.jpg

    I was of the understanding that pallet pivot jewels received no lubrication unless specified, and I haven't seen that before.

    Comment invited from @Archer, @ChrisN, @Canuck and anybody else who would like to.
     
    Edited Jun 25, 2020
  10. tritto Jun 25, 2020

    Posts
    340
    Likes
    503
    Very clever solution Jim. I often use a bit of silicone grease on the washer to prevent it from getting lost if there's a ping moment, but this is a much better solution.
     
    JimInOz likes this.
  11. JimInOz Melbourne Australia Jun 25, 2020

    Posts
    15,489
    Likes
    32,377
    And interestingly, I couldn't see ANY evidence of lubricant on the pallet stones or escape wheel teeth :confused:.
     
  12. Archer Omega Qualified Watchmaker Jun 25, 2020

    Posts
    26,462
    Likes
    65,602
    No, you don't lubricate the pallet fork pivots. You want the pallet fork to be able to snap back and forth quickly and adding oil would cause drag.

    I virtually never see worn pivots on the pallet fork, so there's really no need. There are some who advocate doing it on larger pieces, so pocket watches, but it's not something I have ever done. In school we trained on the 6497, which is a pocket watch movement, and again were taught not to lubricate these pivots.

    The oiling issues you show are not uncommon on these movements from what I hear from other watchmakers who work on them.

    Cheers, Al
     
    JimInOz likes this.
  13. JimInOz Melbourne Australia Jul 12, 2020

    Posts
    15,489
    Likes
    32,377
    With four Seiko 6309-7040s going around in circles on the winder and then heading for a power reserve test, I had some spare time.

    There was a small project that I thought I'd tackle. I picked up a little Seiko 6119 for peanuts and decided to do a restoration, starting with jewelling the plate and train/barrel bridge as most Seikos of this age and style exhibit signs of wear that causes barrel tilt and other issues.

    After replacing the worn bush in the train/barrel bridge with a jewel, I turned to the plate. It was only then I noticed a strange "smiley face" on the periphery of the barrel arbor hole. I hadn't noticed it when I disassembled the watch as it was covered in buckets of dried black grease.

    This is it (note, hole has been reamed ready for the jewel).

    Smiley.jpg

    Any advice on what it is?

    A - Manufacturing mark?
    B - An @STANDY style fix for worn arbor hole?
    (He was a butcher in a previous career, thus the reference to him ;)).

    I did notice some marks/metal bruises on the other side of the plate, possibly from being on a stake anvil?

    Over to the gurus.
     
  14. JimInOz Melbourne Australia Jul 12, 2020

    Posts
    15,489
    Likes
    32,377
    And while I'm in a learning mood.

    Do jewels have a chamfer/bevel side to assist pressing?

    I always instinctively supposed that they did, and when setting a jewel I'd always try and find the side with the most chamfer to enter the plate first.

    It only raised the question in my mind this afternoon when I noticed that the jewel I was going to use has a much more pronounced chamfer than others I've seen recently.

    This is the jewel that raised the "what tha?" lobe of my brain from its sleep.

    Note that the left side of the jewel has a very pronounced chamfer as opposed to the other side.

    JewelBevel.jpg

    So, another question for the gurus.

    (@Archer, @Canuck, @ChrisN et al).
     
    pascs and STANDY like this.
  15. STANDY schizophrenic pizza orderer and watch collector Jul 12, 2020

    Posts
    16,351
    Likes
    44,922
    apsm100 and JimInOz like this.
  16. Archer Omega Qualified Watchmaker Jul 12, 2020

    Posts
    26,462
    Likes
    65,602
    Interesting. My first thought would be someone trying to fix a hole that had worn oval, but it seems too clean for that, and the ends of the punch mark are nicely squared off, so it's almost like it was a purpose built tool that did this, and not just a staking set by some random watchmaker.

    I wonder if this is actually something don at the time of manufacturing, rather than in a service setting. Not sure!
     
  17. Archer Omega Qualified Watchmaker Jul 12, 2020

    Posts
    26,462
    Likes
    65,602
    So, most jewels have an oil sink, so the side of the jewel without the sink goes against the pivot, and the sink goes on the "outside" surface of the plate or bridge. So you press the jewel in from the inside of the plate or bridge in most cases (there are exceptions), so generally the oil sink goes first when pressing in.

    I pulled out my older Seitz jewel set:

    Seitz.jpg

    Here is a plate jewel from that set - the oil sink is on the right hand side, and you can see a slight chamfer on that side also. I would press this in with the right side shown in this photo first:

    Old jewel.jpg

    Next a more modern jewel used in an Omega (several movements, all vintage, so everything from a 471 to a 752):

    Modern jewel.jpg

    This looks more like yours, so chamfered both sides, but the larger chamfer is on the jewel sink side. I would press this in with the left side as shown in this photo first.

    Now jewels for barrel arbors sometimes don't really have an oil sink in them, and in that case I would press them in with the larger chamfer first.

    Hope this helps.

    Cheers, Al
     
  18. JimInOz Melbourne Australia Aug 7, 2020

    Posts
    15,489
    Likes
    32,377
    Not really a full project, but I was happy with this.

    With three Seiko 6309-7040s undergoing timing tests, I had some spare time so I decided to sort out a couple of Sekiko 6119 movements I got to harvest for parts.

    One wasn't a bad looking little watch, so I figured "What the heck, let's see if it can live again".

    A quick check on the timegrapher showed nothing but snow, and -587 seconds per day, so it was disassemble, clean and inspect.
    Then re-assemble, lubricating as parts were put back onto the plates and holding my breath as I re-fitted the horrible little Diafix springs to the escape wheel cap jewels.

    With everything back together and the escape wheel/pallets lubricated, I dropped the balance assembly in and off it went.

    The first Timegrapher shot made me smile. Not even time for the lubes to settle (especially the esacpe wheel) and it was showing good results, even if the amplitude was in the low range (not unsual for Seikos).

    PS: Lift Angle was set to 54.5º

    Donor_6119.JPG

    Things could probably be improved by jewelling the worn arbor holes in the main plate and the train bridge but I think I'll save the jewels for other watches.

    Cheers
    Jim
     
    pascs, ZIELSZIEK, Joe_A and 2 others like this.
  19. JimInOz Melbourne Australia Aug 8, 2020

    Posts
    15,489
    Likes
    32,377
    Servicing my own 6309-7049.

    I think the previous servicerer believed in "more grease makes it better".

    :eek:

    WIN_20200809_14_20_05_Pro.jpg
     
    omegaswisst, pascs and michael22 like this.
  20. Longbow Aug 9, 2020

    Posts
    1,813
    Likes
    9,323
    This mark reminds me of a technique used by a Swiss fiber optic connector manufacturer to achieve perfect fiber core to ferrule concentricity. If you follow this link and look at the little process video you will get the general idea. I suspect Diamond S.A. borrowed the trick from the watchmaking industry.
    https://www.diamond-fo.com/technologies/technology/active-core-alignment-aca/

    If an arbor bushing was surrounded by a suitably mailable metal then this technique would allow you to correct concentricity errors.
     
    JimInOz likes this.