Female Spring Bars

Posts
3,323
Likes
7,844
are a nightmare to deal with......

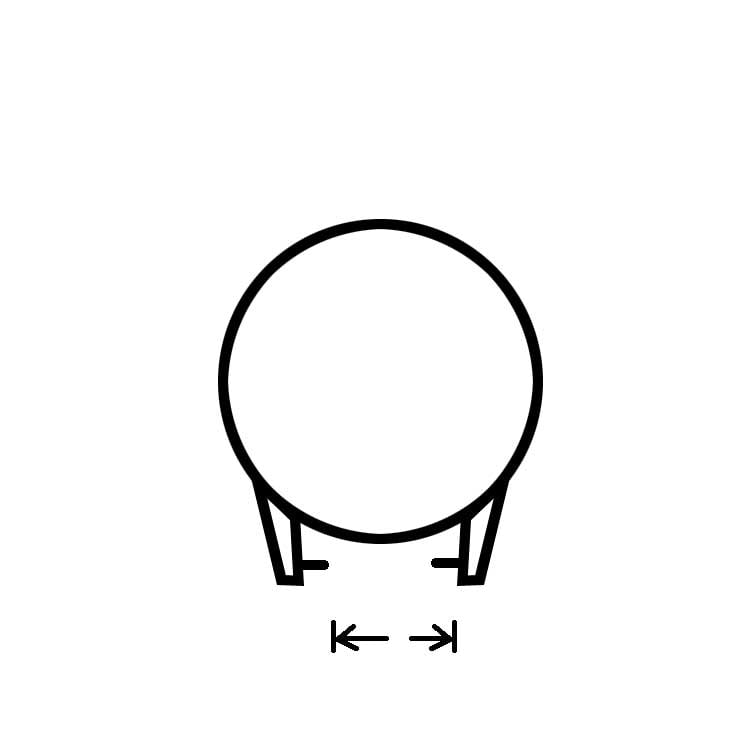
I haven't had to deal with them before UG, and having a hard time getting watch straps on without mangling them. The problem that I see is the lug to lug width must be compressed down to the lug to pin width, which is several MM shorter. As illustrated by the diagram below. With a solid piece of soft leather, like suede, this can be done relatively easily WITHOUT the spring bar, by simply bending the strap in the middle and slipping it around the pins. With the spring bar in place, obviously the strap cannot be bent, and the only option is lateral compression. Again, with a solid and soft strap, this can be done to some degree, but it damages the leather.

With other (dressier) fancy leather straps, there is often a leather veneer on the outside and suede on the inside, with a core of some kind. When I tried to put one of these on a tri compax recently it damaged the strap significantly and the "laminates" started pulling apart to some degree.

Anyhow, I searched online trying to figure out if I was doing it wrong, if there were any tips or tricks, and I cannot find anything.

Am I correct in thinking they are basically a major PITA to deal with, and often the straps are damaged to some degree, and only certain kinds of straps are suited?

Additionally, the pins are often slightly bent, which makes things even more difficult.
 
Posts
2,927
Likes
6,237
Female spring bars traditionally have compressible secondary tubes that fit over the pins.

Meaning that you can take the strap mounted spring bar, mount it onto one of the lug pins, compress it against the side of the lug, and then, with a hard tool, manually compress the other side's secondary tube and fit it over the other pin.

If that makes sense... meaning that there will be no pressure on the strap.
 
Posts
13,158
Likes
52,286
Will keep this in mind. My watchmaker however will install the expensive blue gator strap on my tri compax when I pick it up next week. I've messed with these on my uni and had the same issues as @bgrisso. I was fortunate not to damage the custom strap I'd had made for it. Took me close to 45 minutes to get it right..
 
Posts
159
Likes
195
I just changed the strap on mine this afternoon to a light blue cordovan. I initially tried to use my bergeon tool but it is too thick and the fork does not work well on the female spring bar. I ended using an old knife with a thin but eroded blade. I used tape to mask the lugs just in case, inserted the blade behind the lug, pulled to compress the spring bar while using the flat part of the blade to compress the strap just enough to go over the pin. It worked well without damaging the strap.
 
Posts
6,713
Likes
18,566
Am I correct in thinking they are basically a major PITA to deal with,

Yes, you are!
 
Posts
13,158
Likes
52,286
I just changed the strap on mine this afternoon to a light blue cordovan. I initially tried to use my bergeon tool but it is too thick and the fork does not work well on the female spring bar. I ended using an old knife with a thin but eroded blade. I used tape to mask the lugs just in case, inserted the blade behind the lug, pulled to compress the spring bar while using the flat part of the blade to compress the strap just enough to go over the pin. It worked well without damaging the strap.
😲
 
Posts
3,323
Likes
7,844
Female spring bars traditionally have compressible secondary tubes that fit over the pins.

Meaning that you can take the strap mounted spring bar, mount it onto one of the lug pins, compress it against the side of the lug, and then, with a hard tool, manually compress the other side's secondary tube and fit it over the other pin.

If that makes sense... meaning that there will be no pressure on the strap.

I'm not understanding, can you explain? I don't see any to avoid having to reduce the width of the strap by the size of one of the pins, perhaps 2-3mm. So my 19mm strap has to get squeezed down to at least 17mm, regardless of the methods, tools, etc.

Some straps can take it, and others can't. Unless I'm not understanding the correct technique.
 
Posts
159
Likes
195
Not 17 as you place the strap around the spring bar and the spring bar over one pin, so the strap will be against the lug on the left when you compress on the right lug.
So it is 1mm you have to go over, not 2 and you strap should be compressed to 18mm not 17. Of course if you use Bergeon pliers you have to go over the 2 pins at the same time, I would not use that tool for female bars. What I said before is that pushing the bar and strap over the pin with a flat smooth (not sharp I mean) thin blade is better than with the usual fork took as you apply force over a larger and flat surface, it is easier to insert between the bar and lug as thinner and flat, and all you need is 1mm. My watchmaker showed me this, he said that this technic is less likely to mark the inside of the lugs than the usual tools. Of course I mask the lugs with tape before doing anything...
 
Posts
1,931
Likes
22,749
Took me about 45 minutes the first time too, less than 5 seconds after that. The key is just to get it right first.

These are the easiest steps for me,

1. Massage the ends of the straps first, gently and slightly compress it by 1-2mm depending on the type of leather (please see how the top end strap is a tad shorter than the bottom one after I massaged it)


2. Insert the female spring bars to the straps (at this point, the straps should be shorter by 1mm than the spring bar and there should be an excess spring bar showing on one of the end)


3. Place the straps with the female spring bar in it, into one pin (on the side where there's no excess spring bar showing)


4. With the fork end of spring bar tool, go to the other side, push and hold the leather strap (that has been compressed by 1mm) and the female spring bar tube together until you get the lug pin to fit completely or at least on top of the spring bar like this photo below (please note that at least, the lug pin need to go over the leather strap first).


7. Once everything is in place, massage back the strap end back to the original size until the spring bar is not showing anymore


8. Repeat on the other side
 
Posts
3,323
Likes
7,844
Thx Dre. That is close to what I did on the solid suede strap and it worked fairly well. The fancy leather strap that had a core, plus outer and inner leather veneer glue to it, did not fare as well. But I will keep working on my technique.
 
Posts
6,713
Likes
18,566
Dre Dre
Took me about 45 minutes the first time too, less than 5 seconds after that. The key is just to get it right first.

These are the easiest steps for me,

1. Massage the ends of the straps first, gently and slightly compress it by 1-2mm depending on the type of leather (please see how the top end strap is a tad shorter than the bottom one after I massaged it)


2. Insert the female spring bars to the straps (at this point, the straps should be shorter by 1mm than the spring bar and there should be an excess spring bar showing on one of the end)


3. Place the straps with the female spring bar in it, into one pin (on the side where there's no excess spring bar showing)


4. With the fork end of spring bar tool, go to the other side, push and hold the leather strap (that has been compressed by 1mm) and the female spring bar tube together until you get the lug pin to fit completely or at least on top of the spring bar like this photo below (please note that at least, the lug pin need to go over the leather strap first).


7. Once everything is in place, massage back the strap end back to the original size until the spring bar is not showing anymore


8. Repeat on the other side

Step 1: Fit watch strap

Step 2: Fit external bezel & crystal

😵‍💫
 
Posts
69
Likes
150
They are a bit of a pain but if you get the right style spring bars with the larger diameter ends then it isn't so bad. I have never gotten a strap smaller than the proper lug opening. There are ways to comfortably get the strap in place and then just compress the bar slightly to get it on the pin. I've mastered it.. 😀
 
Posts
12,778
Likes
17,348
I would suggest purchasing a small assortment of sizes, so that you can pick the ones that work best for you:

https://rover.ebay.com/rover/0/0/0?mpre=https://www.ebay.com/ulk/itm/232537778665

Some vendors measure these by the lug size they are supposed to fit and others by the length of the uncompressed spring bar. There will always be a difference of 2mm to 4mm between these two measurements.

FWIW, my UG Uni-Compax has 20mm lugs, but uses 22mm female spring bars from the above assortment, which I purchased.

Hope this helps,
gatorcpa
 
This website may earn commission from Ebay sales.
Posts
1,820
Likes
27,949
The length is fine which is 19mm but the hollow end will not go in the UG pins. The spring bars hollow ends look smaller by 5-10 mm.
 
Posts
16
Likes
36
Chagrined to click on this thread and learn it was not about where to do tequila shots with coeds in Panama City Beach... 😎
 
Posts
21,763
Likes
49,371
The length is fine which is 19mm but the hollow end will not go in the UG pins. The spring bars hollow ends look smaller by 5-10 mm.

Well, I don't think you mean "5-10" mm, since the entire pin is probably not more than 2mm in diameter, but I get the point. This is a common problem since the modern female spring bars have small inner diameters. The old-fashioned ones often had large hollow flanges at the ends, like these below. You should measure the outer diameter of the pins.

https://www.ebay.com/itm/FEMALE-SPR...fb:m:mNvyq4iioZTQfUTr3vih7jQ&var=492755128446

s-l1600.jpg
 
This website may earn commission from Ebay sales.
Posts
1,820
Likes
27,949
Well, I don't think you mean "5-10" mm, since the entire pin is probably not more than 2mm in diameter, but I get the point. This is a common problem since the modern female spring bars have small inner diameters. The old-fashioned ones often had large hollow flanges at the ends, like these below. You should measure the outer diameter of the pins.
https://www.ebay.com/itm/FEMALE-SPRINGBARS-Large-1-2mm-End-Hole-for-Vintage-Watches-10-14-16-18-20-22mm/192616897531?hash=item2cd8dc9bfb:m:mNvyq4iioZTQfUTr3vih7jQ&var=492755128446

Thanks, Dan,

Yes, you are right. I should have said .05mm and .10mm because the ends are .75 to .80 wide on the Esslinger site for the 19mm. I will check the link above and as always, thanks to @bgrisso is helping me out with a set for the short term.
Edited:
 
This website may earn commission from Ebay sales.