rendo
·I wasn’t patient enough to read the story but the pictures were enough to appreciate your post. Enjoy!
I wasn’t patient enough to read the story but the pictures were enough to appreciate your post. Enjoy!
Congratulations. I am very impressed with your work.
.......and your access to resources!
Most impressive.
Wow, the end result is nothing short of absolutely fucking gorgeous!

Out-freaking-standing work! Very impressed! Beautiful work and beautiful finished product!
Just woaw. I still have some family over today, but when I have a longer moment, will definitely come back and read the whole article.
Thanks for sharing… outstanding work. And hi from another Spaniard (Madrid).
Beautiful results, it is ready for the grapes on New Years, felicidades!
 !! Thank you very much !!
Amazing work and words to accompany them.


Wow! I'll put in my vote for post of the year. I was caught up in the details of the restoration of the movement, saw how it cleaned up so well, and was thinking to myself: too bad about the case, I'll bet he ends up having to just find a replacement. Then I see the gleaming gold case after your first try at electroplating. Amazing job, and very well written story.

You probably speak and write better English than many of those who have it as their only language
A little over a month ago I created a thread to clarify some doubts about a Seamaster that I wanted to restore (I call my restorations as "rescues") by myself.
Some members very kindly offered me their help (especially the colleague X350 XJR) to clarify the doubts I had about the watch (the watch is a model from the American market, I am from Spain so the model was not familiar to me and it generated those doubts in me).
In that thread I promised that I would update the progress of my "rescue", well, I didn't really update each step, but what I promised is a debt and now that I have finished restoring the watch, I would like to share with you the entire process (it will be a bit extensive, if you decide to continue reading, settle well, I hope the trip is to your liking):
I had been wanting to get a vintage Omega that had certain qualities and on which, if possible, I could carry out one of my "rescues". So, I found a vintage Seamaster on a Spanish trading platform, I couldn't resist its charm and I acquired it.
The description of the watch provided by the seller stated: "Omega Seamaster 1958; gold-plated case with screw-down steel back; 36mm diameter without crown; 491 movement with seconds at 6 o'clock", and a, literally "Very good condition and working, although a review is recommended", and I already imagined what the "Very good condition" thing was going to be like, which I took for granted due to the low price of this unit for a Seamaster of that characteristics and era.
So, I already had my Christmas self-gift as well as a new small rescue project!!! (although maybe I should say great project with everything I had to do to it in the end).
These are the photos published in the advertisement, and although we already know that the quality can be quite bad due to the compression that the buying and selling websites exert on these files, several things could be perceived from them: the gold plating appeared be quite scratched and even, if we looked closely, one could sense that the upper faces of the ends of the lugs were already peeled; It was also apparent that the crown, which according to the seller is the original of the watch (at least it is Omega signed/original and seems correct to me for that era, although I am more familiar with having seen them on Constellation models), had lost all of its gold plating; There were also several scratches on the plexi and what appeared to be a break on its external perimeter in the 11 o'clock area; In the same way, if we were to draw an imaginary straight line that went from the center of the axes of the hour and minute hands to the applied 4 o'clock index, we would find a round spot located halfway between the aforementioned elements; This stain, along with other smaller ones that could be seen on the subdial of the seconds hand, could not be known, from these photos, if they were on the dial or on the plexi; You could also distinguish what appeared to be dirt, or damage, on the dial at the lower end of the applied 1 o'clock index and on some other indexes. But perhaps the most noticeable of all was the misalignment suffered by the hands, since for the displayed time of approximately 10:10 hrs., the hour hand should have already surpassed the applied 10 o`clock index, which as we can see it has not done...and these are only some problems that this unit suffered from, as you will see next.
Once the watch arrived in my hands, oh, surprise!!, and not one, but several: the first of all is that this was not a gold-plated model, since between the lugs at the 6 hrs (and on the steel back) included the legend "10K G Filled", which, as all of you know, refers to a coating with gold foil and not to an electrolytic bath.
The fact of discovering that it was a 10K gold laminated model was the first clue that led me to think that this was not a model that was originally created for the European market, but for the American market. Then it was when I created the thread here to clarify my doubts, and it was when the information obtained about the cassist (Jonell) and the import brand "OXG" confirmed that it was a Seamaster model that was originally marketed in the U.S.A.
Although a gold laminate is much thicker than a plating, unfortunately in this case it was very damaged and everything that could be guessed in the photos of the advertisement became something worse when being able to see the watch in situ. Both of the sides/flanks of the case and lugs and in the upper area of the case (bezel`s area -although this case is made of one piece and does not have a removable bezel), the gold laminate showed significant damage; some scratches and dings were very deep. Furthermore, as seen in the photos of the advertisement, and despite being a gold laminated finish, not a plating, the ends of the upper faces of the lugs were already peeled, leaving the stainless steel from the case is made visible.
Although it is normal to expect some wear in a finish with these characteristics of a watch that is almost 70 years old and that has had its use, in this case it seems that instead of use what it received was complete abuse. Below I show you in more detail the state the watch really was in when it arrived:
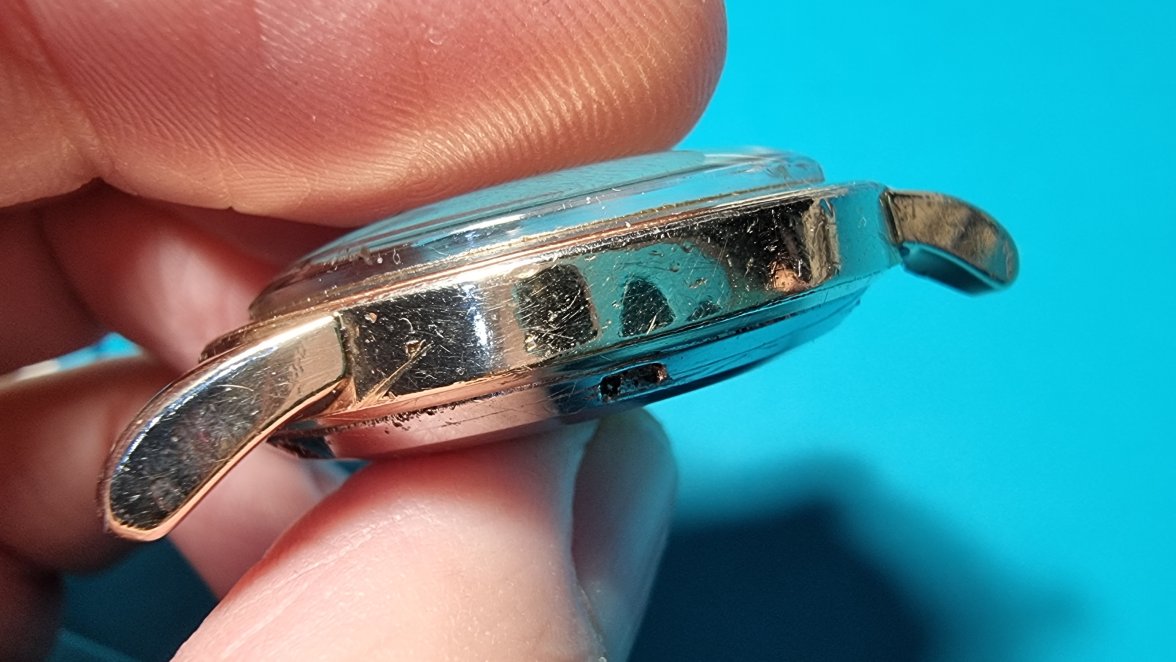
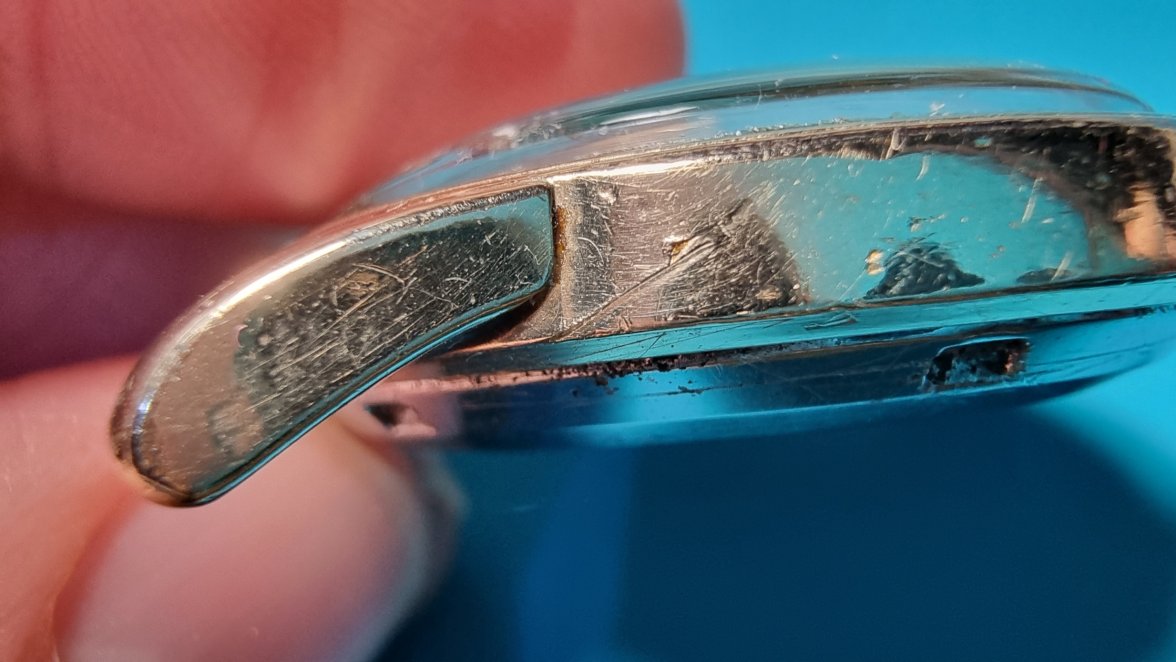
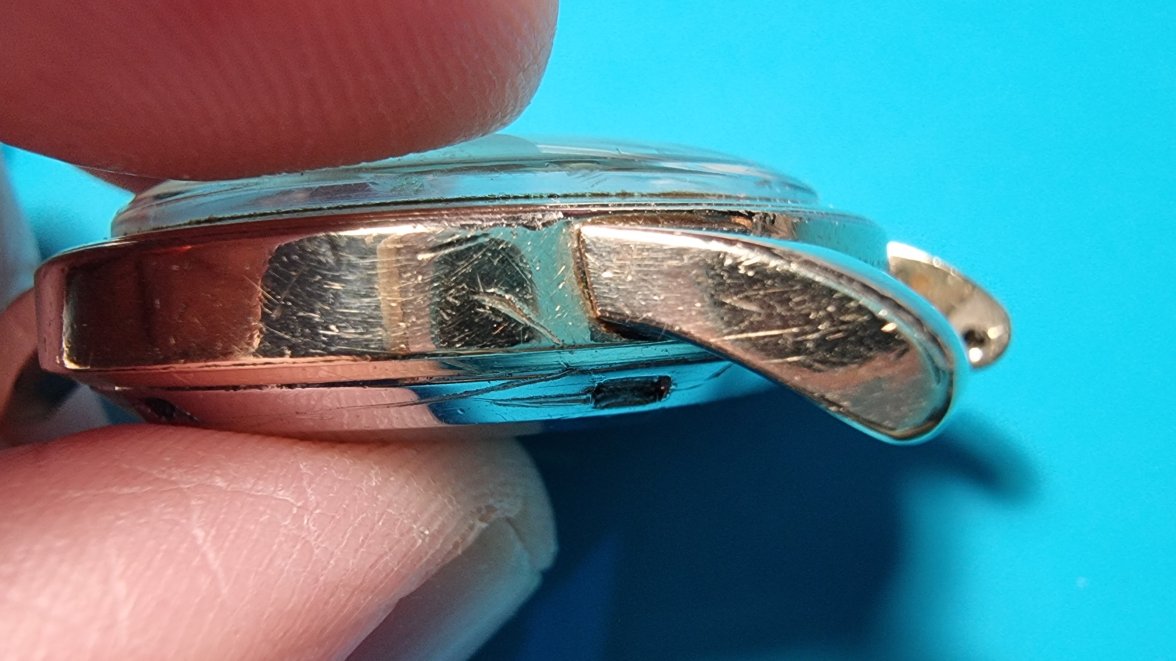
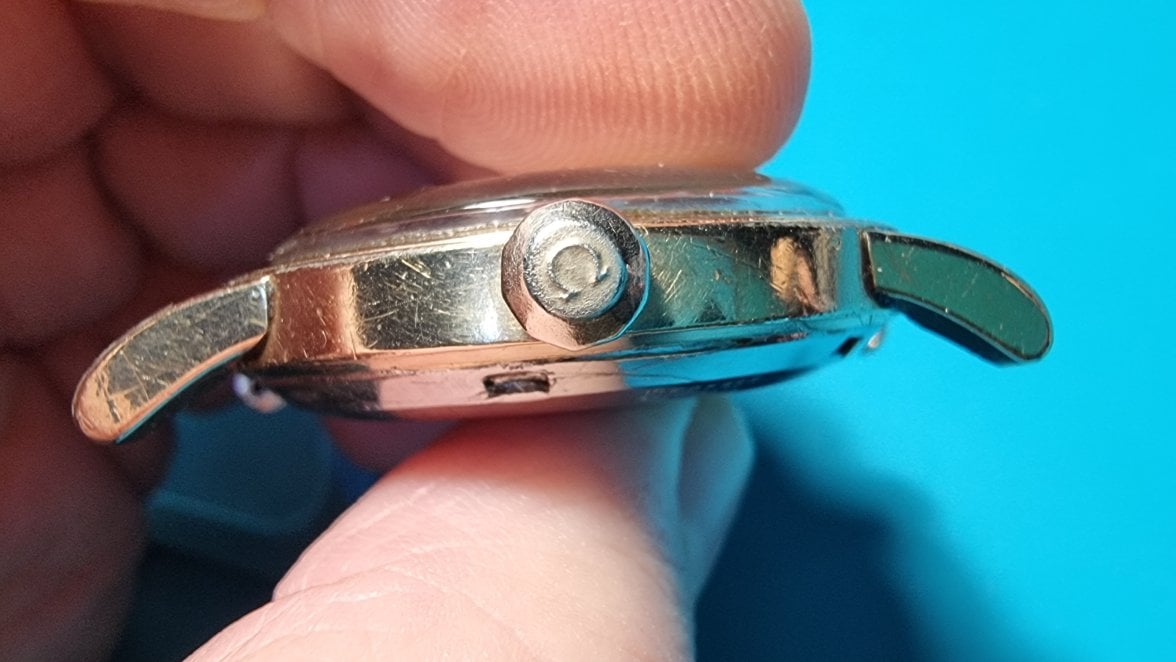
Here, surrounded in red, you can see more clearly the areas at the end of the lugs and the area between them where the gold sheet has been completely worn away, leaving the stainless steel visible. The other two lugs are obviously just as bad. Also, surrounded in green, I show you the breakage of the plexi and the theoretically accumulated dirt at the applied 1 o`clock index. Both damages were already evident in the photos of the advertisement:
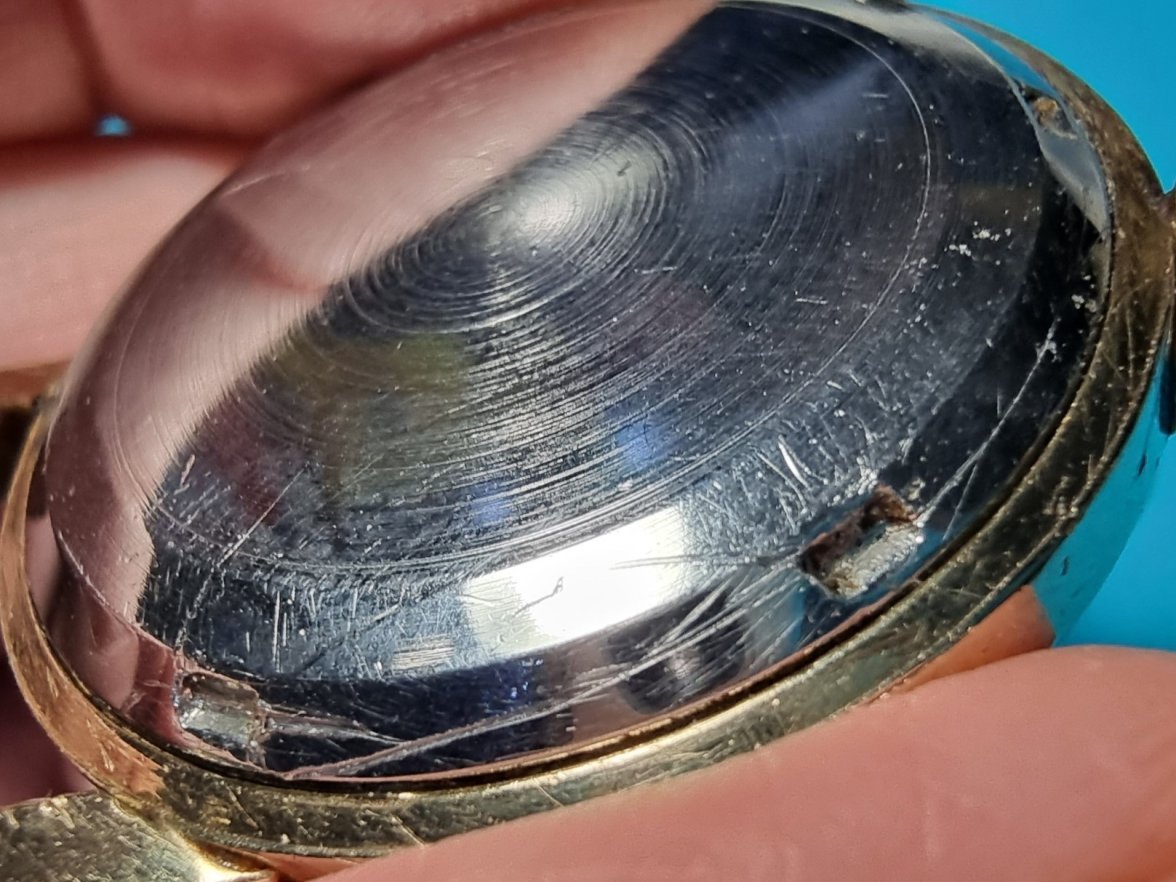
The steel back was no exception and, like the rest, it had multiple dents and the typical scratches, some very pronounced, caused by the tools used to open it throughout its life:
Once the external exploration of the watch was finished, it was now time to open it.
When I opened it, the first thing I noticed was that there was no gasket, neither on the steel back nor on the case; something that is usually a very bad sign, since the absence of a gasket usually indicates that dirt, or something worse: water, has been able to colonize the inside of the case and, therefore, also reach the movement. I wasn't too wrong, but first let's focus on the inside of the steel back.
The information engraved on the inside of the back, which you can see in the image, was not at all familiar to me as it was not a model for the European market, but at least now I could see the real references of the watch (since in the advertisement there was no were mentioned), we also see the "Jonell" logo (which I didn't know when I opened the case):
It was time to check the movement and, of course, more surprises: the watch movement is a 490, not a 491 as was advertised (although, as you know, the only difference between the two is that the 490 has 17 jewels while the 491 mounts 19 jewels).
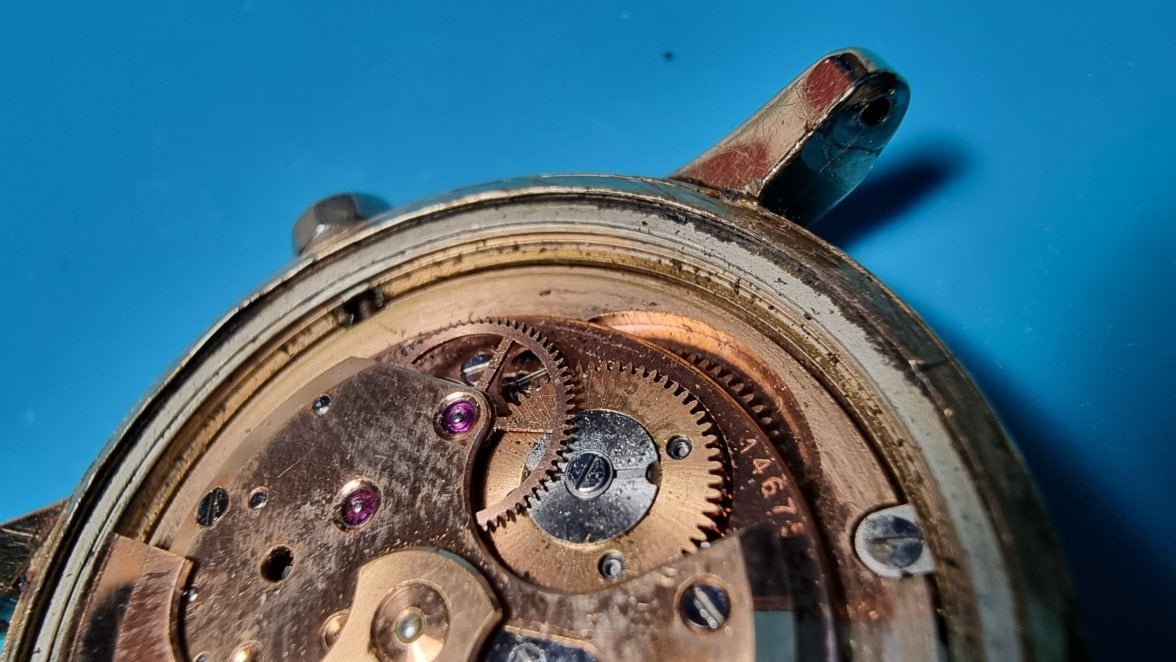
Next thing was to try to know the manufacture year of the watch. From the movement´s serial number (14,675,542) comparing that number with different lists existing on the net, it looks like this watch would have been manufactured in 1954 or 1955.
But, in the documents published by Omega itself about the 490 - 491 movements, it is stated that these were not released until 1956.
So, what is the reason for this "contradiction" in the years?. Well, I have my theories, conjectures that I will not mention here and now since this thread is not for that. In any case, this watch is not a 1958 model as the seller advertised, but rather a model manufactured in a period between 1954 - 1956; and if to estimate a manufacture year of the watch I have to pay attention to certain information, I prefer to do it based on what Omega itself provides in the data sheets of these movements, so, leaving aside the dating that can be done by the movement's serial number from the lists found on various websites specialized in Omega, I will conclude that the watch was manufactured in 1956 as Omega itself indicates. (If anyone is interested in discussing the "contradictions" that I found searching for the possible year of manufacture of the watch, let me know in a comment and we will delve into the matter).
Oh !!, before I forget to tell you, the measurement of the case diameter was also wrong in the advertisement, since it measures 35mm without including the crown, not 36mm as advertised.
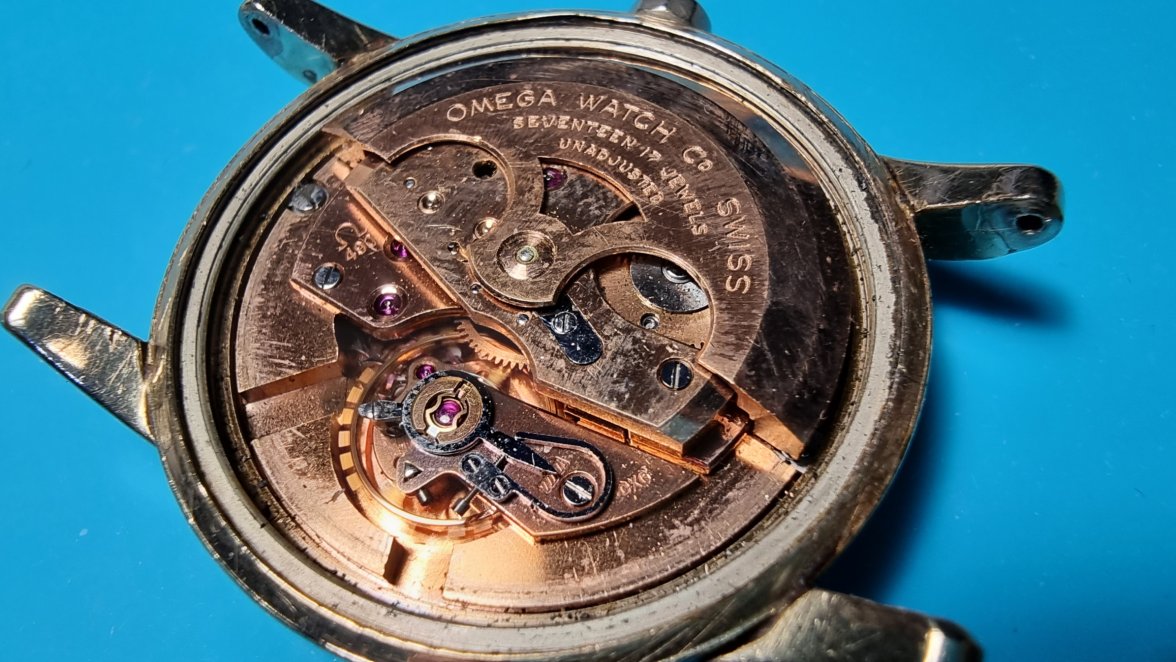
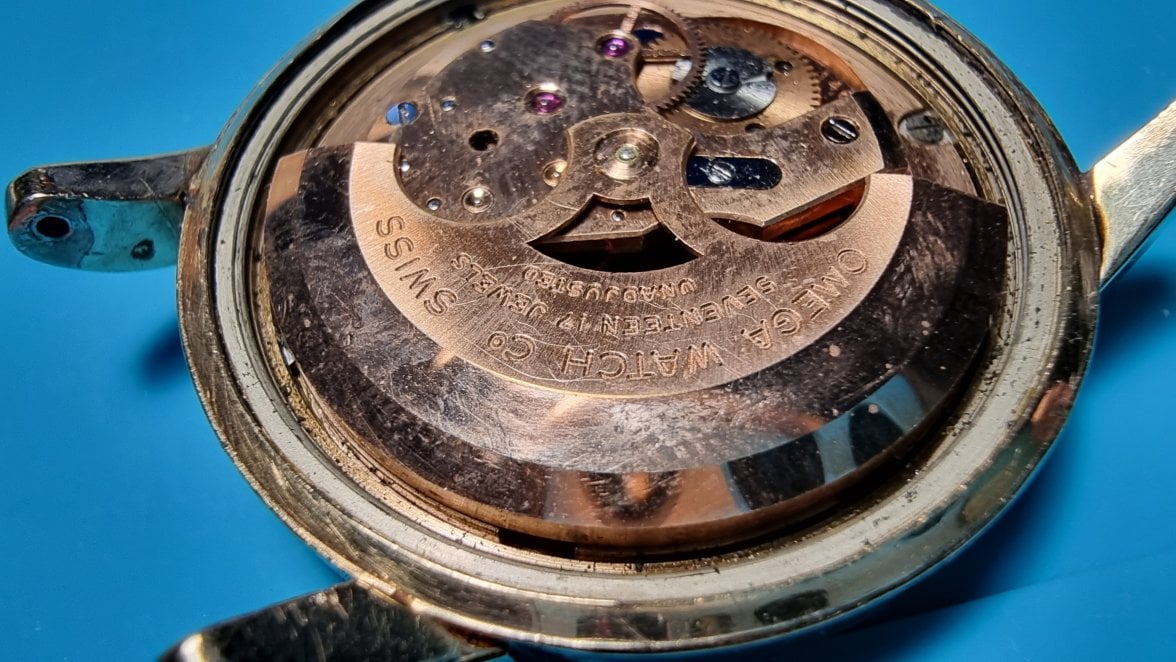
As I imagined, the absence of a gasket had allowed dirt to invade the interior of the case and reach the movement, although, thank God, there did not seem to be any traces of water. Of course, there were lots of dirtiness and fingerprints (...it seemed a perfect case for Horatio from CSI Miami...).
This is the condition of the inside of the case and the movement when I opened the watch:
I even found that surrounding the end of the rotor shaft there was a good colony of lichens living there.
Well, this is the "Very good condition and working, although a review is recommended" to which the seller was referring, thank goodness it was in "Very good condition", because I don't want to imagine what the watch could be like if it weren't like that. Although I have to say, it worked, indeed, it worked.
Of course, many people would have returned a watch in this condition, but since I wanted it to rescue it, since I still liked the watch model a lot and since I consider giving up in the face of a challenge like that to be cowardly, then ...it was time to put on work clothes!!!
The first thing to do would be to undertake cleaning and service to the movement.
As we all know, these were very good calibers for their time, starting with 470 this entire family of movements were the first to include a bidirectional loading rotor and came to replace the previous generation ones equipped with a bumper. They mounted Glucydur balance wheels and Nivarox hairsprings, which meant an increase in performance in terms of antimagnetism, durability, invariability in the face of temperature changes and absence of corrosion; Furthermore, as shown in the photos, these 490s already had a precise, and beautiful, gooseneck type adjustment to regulate it, etc, etc, etc.
Despite all the virtues of these movements, they could also cause problems, especially if periodic maintenance was not carried out, as we will see below.
Once I had dismantled the self-winding device from the rest of the movement, I found the first problem that could not be corrected with a simple cleaning and re-lubrication. This was the total wear of the reduction wheel of the aforementioned device, caused by its stop click that acts on it by its spring. And this is one of the problems that can arise in these movements if they are not reviewed regularly. I don't know when it was last serviced, but I'm sure it was a long, long time ago (...in a galaxy far, far away...) based on the state of the reduction wheel and the dirt accumulated on the rest of the components in general.
Here you can see, surrounded in red, the wheel that has suffered wear and, surrounded in green, the stop click that produces its erosion at the point where it occurs:
Here you can see in more detail the massive deterioration suffered by the wheel and which has ended up making it totally useless:
Once we remove the damaged wheel from its place, we can see the enormous trail of chips that has been created as the wheel has been consumed and that have accumulated both on the upper bridge of the automatic device and on the lower bridge of the same device. Chips that are very dangerous since they can, and usually do, migrate to the rest of the movement elements, potentially damaging them when introduced through them:
The same upper bridge of the automatic device after its complete cleaning and with the stop click already reassembled:
On this occasion, the vast trail of chips has not been located only in the bridges of the automatic device but a good part of them has fallen on the train wheel bridge and have also slipped through the gap between it and the crown wheel; Other chips have ended up on the cap of the crown wheel core and finally some more have landed on the double ratchet system that is mounted on this movements. All of this could have wreaked havoc on the movement in the medium term if this had been left alone and if I had continued to make regular use of the clock without first servicing it. Photos where you can see in more detail the chips over the elements I just described:
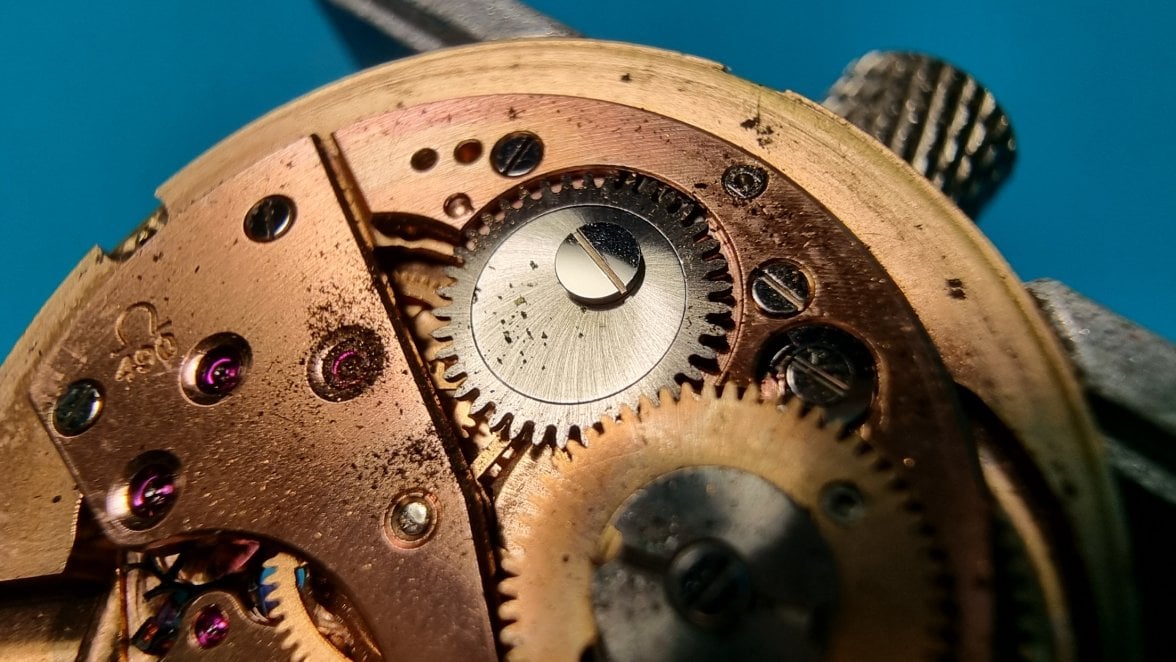
Fortunately, every component under the train wheel bridge was dirty but undamaged, as well as above and under the barrel bridge; nothing that couldn't be solved with a good cleaning. Here the escape wheel is out of its jewel, probably displaced from its place when lifting the train wheel bridge:
In the image on the left the movement is partially dismantled, at that point the mainspring had not yet been removed from the barrel, the double ratchet wheel system was not disassembled, the worn reduction wheel appears that had to be replaced, all the screws do not appear because they were receiving Its cleaning and other things that appear such as the plate, rotor and the different bridges had already received their cleaning. On the right, the double ratchet wheel system already disassembled and receiving its benzine bath prior to cleaning each element with a fine brush; If you look at that photo you can clearly see the traces of dirt that the pieces released when putting them in the bath. You can also see some small chips that we talked about before, which had already gotten between the two ratchet wheels, and which could have cause harmful effects of being trapped there:
After having cleaned everything thoroughly, greased and mounted the mainspring in its barrel, after lubricating the barrel seats, mounting bridges, lubricating all wheel jewels, balance jewels (from incabloc located on the plate), the crown wheel core seat and the double ratchet system, the assembly went perfectly:
Once the pallet fork and its bridge were assembled, having lubricated the jewels of its axis and jewels, it was the turn for the balance and hairspring with its bridge (both, the balance wheel and the hairspring seemed to be in perfect condition to my eye, even with everything I placed them on a conical support for its bridge and, after cleaning the hairspring with a couple of spray strokes with isopropyl alcohol, I left them covered for a couple of days so that gravity would act and correct any small irregularities that the hairpring could have; although I already said that at first glance it did not seem to have any), once the jewels at the top of the balance axis were lubricated (incabloc located on the bridge) and after a minimum spring load, the movement recover once again a healthy TIC TAC!!. It is always very gratifying to see how the movement regains its life again !!
Meanwhile, I had already received the spare part, new and original of course, for our reduction wheel (ref. 470-1432), so I could finish mounting the self-winding device:
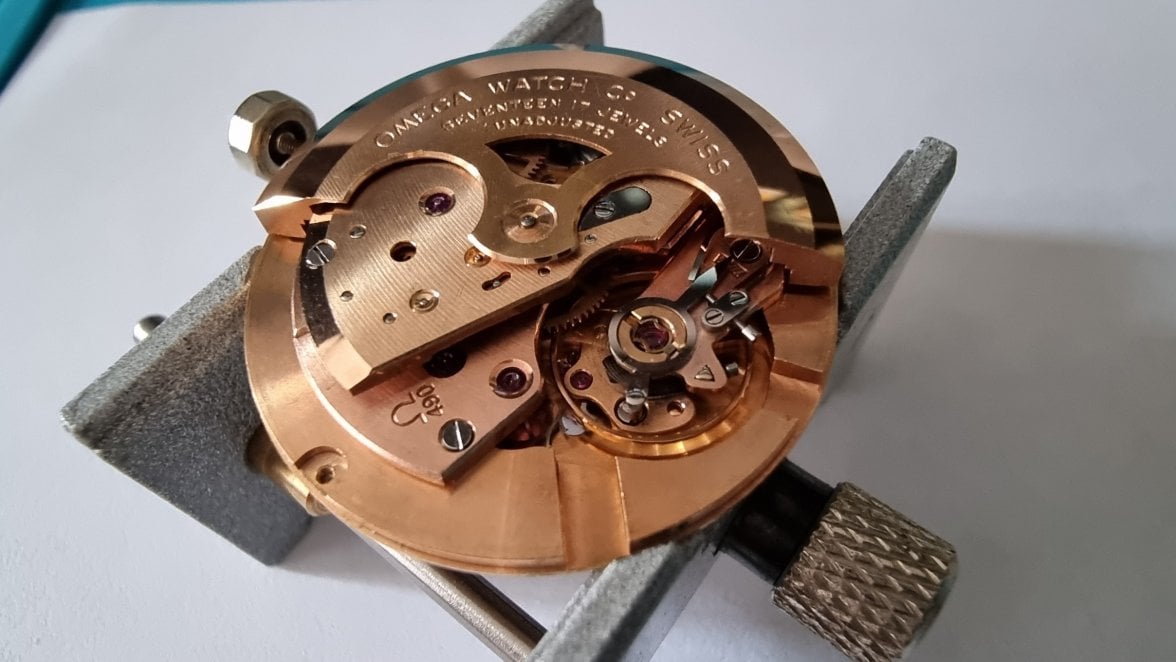
As the French say: Et Voilà!!! The complete movement, once ready, was practically like new for being almost 70 years old and, above all, compared to the state it was in when it arrived to my hands:
Since the heart of the watch was beating in good health again, I could continue with the next element to rescue: the case.
It was going to be an arduous task, we all know that the case is another essential element of a watch, so while I turned it over with my hands, I kept asking myself: how am I going to recover a case of these characteristics, with the gold laminate this damaged, with dents and scratches so deep in multiple places and having the laminate completely peeled at the ends of the upper faces of the lugs (and in some other areas between them) where the stainless steel is already showing?
There was no point in considering measures that did not adhere to the reality of the situation; thinking about completely laminating the box again was totally unfeasible for several reasons, some of them obvious.
The most feasible solution was to perform an electroplating (electrolytic bath) that would uniformly recover the gold finish on the entire surface of the case, respecting, if possible, as much of the original gold lamination as possible.
And the truth is that theory sounded good in my head, but putting it into practice meant I had to clarify several doubts: I didn't know if on top of a 10K gold laminate I could apply 14K, 18K or 24K gold plating, or if on the contrary, they would have to be 10K gold baths to avoid any reaction on the piece; In the same way, I also did not know if the stainless steel needed any specific process to be able to be gold-plated since it was stainless steel that was protruding and had to be covered at the ends of the lugs. Those were my main doubts, but they were not the only ones, I had many more questions regarding electroplating processes since I had never done them before, nor did I have the slightest technical knowledge of the subject.
So there was nothing left but to study and get informed, and that's what I did. After a few days studying about the processes and techniques of electroplating, the different materials to be treated, the type of electrolytes to use, types of electrodes, voltages, amperages, etc., etc., in the end I was able to clarify all my doubts, including the main to do gold plating the case: now I knew that with a 10K gold foil I could make either 14K, 18K or 24K gold plating; My decision was to make the baths in pure gold, that is, using 24K yellow gold electrolyte.
In the same way I was able to know that, indeed, stainless steel normally requires prior acid activation to be able to be gold plated (although there are specific gold electrolytes to be able to gold plate stainless steel without it needing a prior activator, but they are more expensive electrolytes).
So taking advantage of this project and Christmas, I gave myself a power supply and the necessary gear to set up a small and humble homemade electroplating station, which is great for me both for this project as well as for future rescues.
Since I do not have pro machines or many other resources that professional watchmakers have in their workshops, I did the entire process of preparing the case for the electroplating by hand. Considering that gold is a relatively soft material, starting with roughing with fine grains moving on to refining with very fine grains. It was a task that took a lot of work, in these cases patience and perseverance are essential to carry out a task like this to a successful conclusion.As I already knew, some scratches and dents in some areas of the case flanks, lug flanks and top of the case (bezel area) were so deep that it was necessary to supress practically the entire thickness of the gold laminate in those areas to be able to equate them before leaving a surface that is as refined as possible for polishing prior to degreasing before electroplating. In the rest of the case areas I simply refined the original gold lamination a little, that is, I tried to respect the original laminate in the areas I could.
Once the case was roughed, refined, mirror polished and degreased, it was then time to do the electroplating, it was the first time I had done one in my life, I carried it out in two phases with two different 24K yellow gold electrolytes:
- First, an initial phase carrying out baths with 24K gold electrolyte without additives.
- Second, a final phase carrying out baths with 24K gold electrolyte with cobalt additive, this generates a much harder gold coating thanks to the hardening factor created by cobalt as an additive, making gold baths with this electrolyte much more more resistant to scratches, abrasion and impacts, this is what is known as a "hard gold" finish.
The steel crown, which as we saw at the beginning of the thread had completely lost its plating, followed the same electroplating steps as the case. I also blued the stem after removing a little rust that it had in the threaded area near the crown.
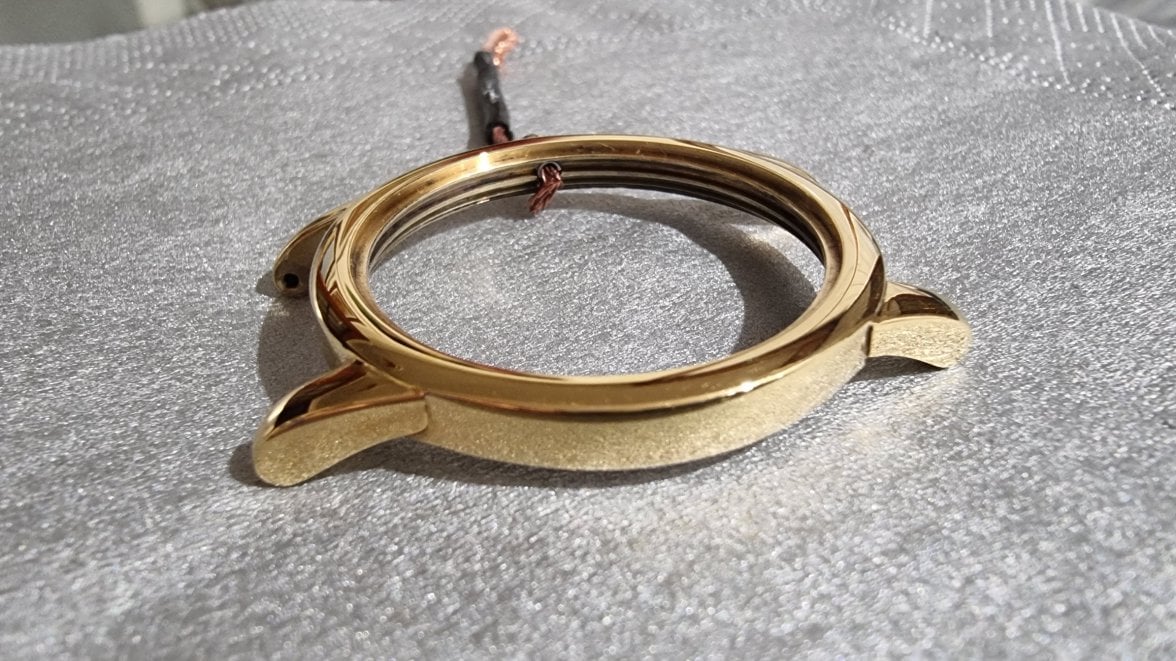
Here the case after the first phase of electroplating using 24K gold electrolyte:
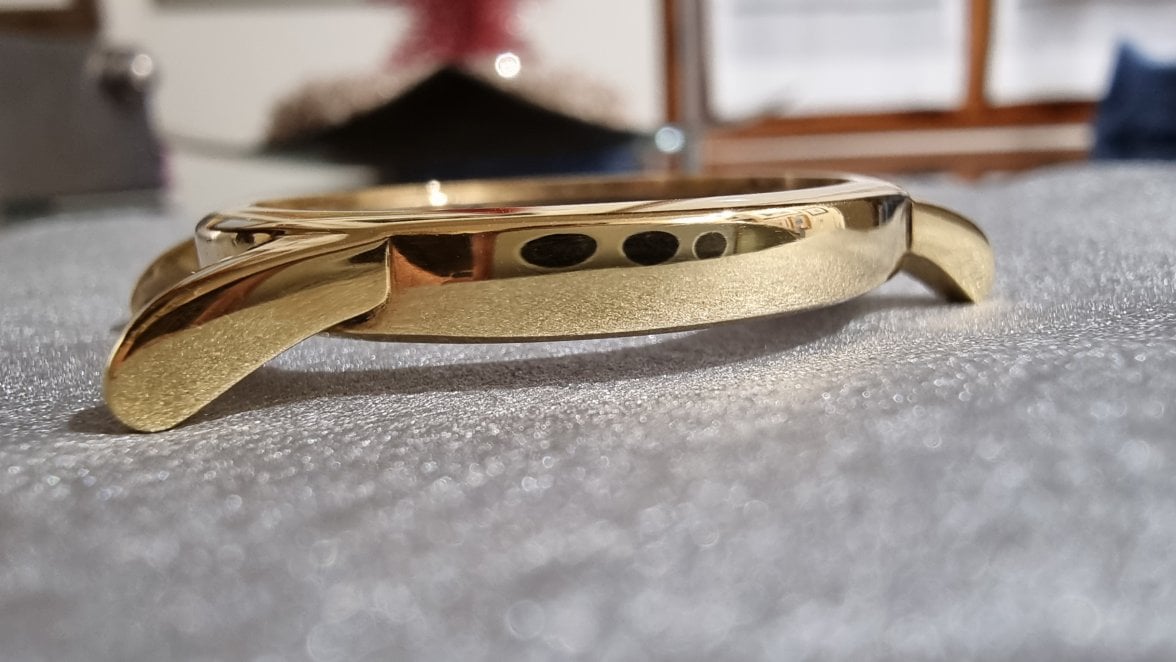
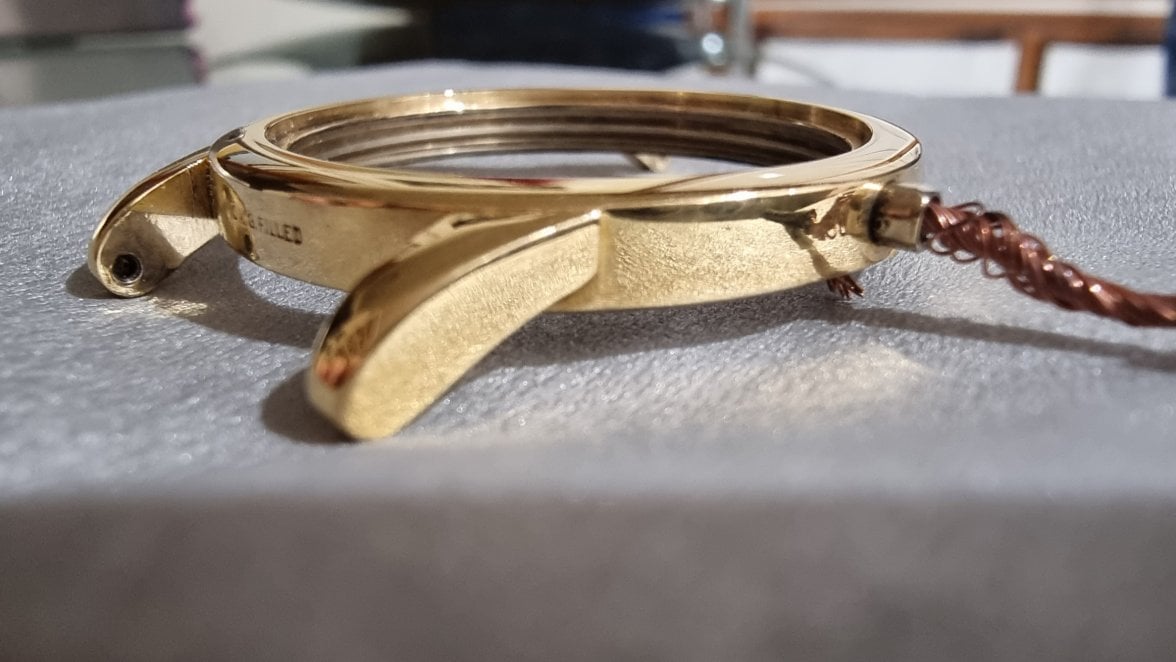
Here the result the case (and crown) after the second/final phase of electroplating using 24K gold electrolyte with cobalt additive ("hard gold"):
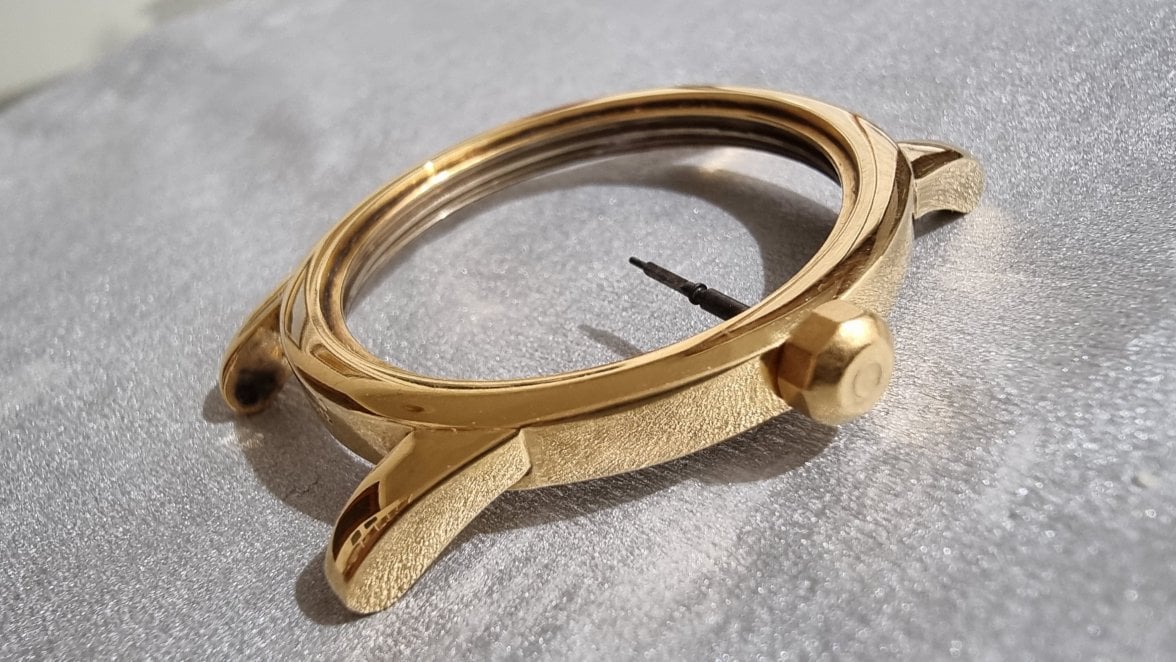
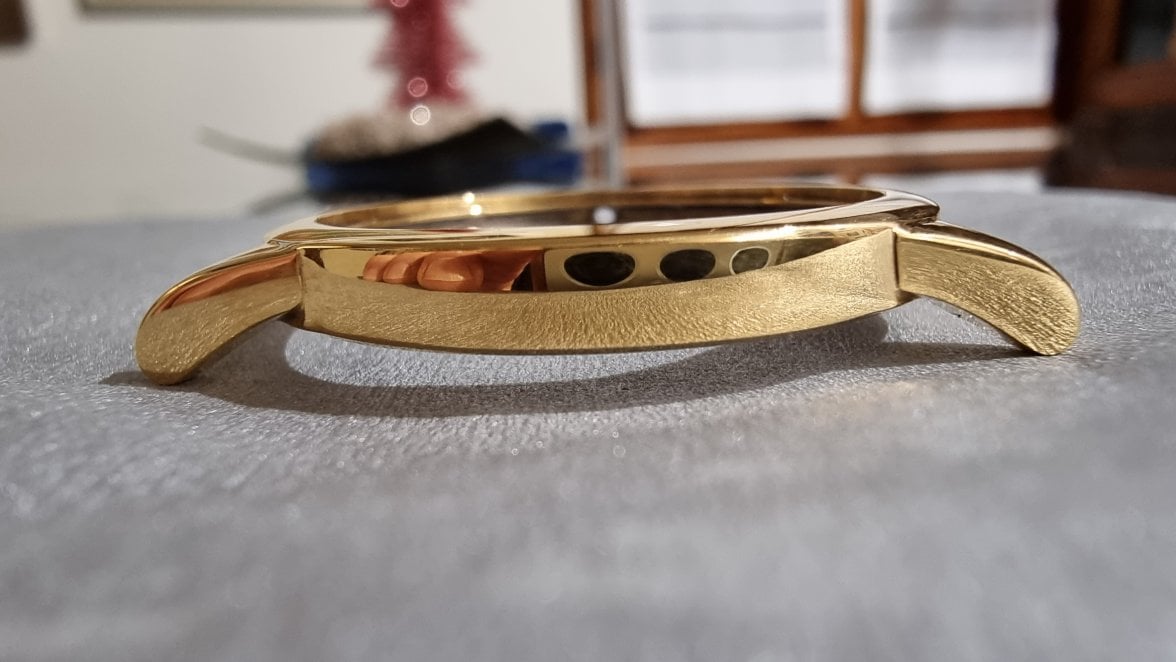
I calculate that with the total of the baths made in the two phases of electroplating, the thickness of the gold in the case is about 20 microns (which would be added to the thickness of the 10K gold foil in the areas of the case where it continues maintaining it).
It had taken me a lot of work to obtain a result like this, but I finally had the case ready and in the state in which I imagined it when the rescue began, so nice !!!
Now it was time to find and install new plexiglass.
It's a shame that the plexi that came mounted on the watch was broken. In the photo on the left I show you the break in more detail, since it seems to me to be the original plexi (or at least original, signed with the omega logo). In any case, you can't notice the break area to the touch, so I cleaned it (also its gold metal ring, which was quite dirty) and polished it a little because I don't want to throw it away, I'm going to save it in case anyone day I need it for an emergency.
Taking its measurements and looking for the reference of the case (something complicated for me as it is an American made case and It do not had references that were familiar to me) I have tried to find the appropriate crystal, it has not been entirely easy but finally I was able to find out the correct original Omega plexi for this case: the reference PX5000. I looked for a new spare part, I was able to find it so in a few days I had it at home as I show you in the image on the right:
The case with the new plexi already mounted. Everything goes perfect at this point !!
It was time to get on with the dial and hands.
Fortunately, the beautiful, domed dial of the watch is in fairly good condition for being around 70 years old. As with a previous rescue I performed on a 1970s Seiko, having a hunch, based on the ad photos, that the watch face was in good condition was one of the reasons I which I decided to buy it. If I had realized that the dial was in worse condition, I would not have bought this piece since the dial is another vital element of the watch and I do not have (at least not today) the experience or the tools necessary to restore one dial that is very damaged, in addition to the fact that we all know that sending a dial to a specialist to restore it is not something that is cheap (apart from the fact that I would lose the charm of the rest of the "rescue" by not having been able to restore it myself like the other parts).
Additionally, it was a joy to discover that it maintains its original finish and that all the sources/legends are the original ones!!, that is to say, that its good condition is not because it has been restored (many from this era are). The color is very pretty and goes from an off-white tone to a light gray tone, both slightly pearly tones, depending on how the light hits it. Also, depending on the type of light it receives, a certain grainy texture is perceived in the paint under the lacquer, which is not metallic (but which does remind us of the metallic paints that later came to the industry). The finish of the seconds subdial follows the widespread pattern, as far as subdial finishing is concerned, of concentric circles in relief, which creates a reflective effect characteristic of this type of finish that, in a certain way and at sight, it resemble the effect achieved with "sunburst" type finishes.
There is practically no damage: what I thought was a small scratch on one side of the applied Omega logo was simply a very fine textil fiber or hair that was adhered to the dial and that with great care (so as not to damage anything) I was able to remove it. All the stains/spots that I anticipated from the photos in the advertisement and that I did not know if they would be on the dial or on the plexi, were finally stains/spots located on the inner face of the plexi. The dirt that was applied at the 1 hr index (and some more) was simply that, dirt accumulated in those places, and I could remove it without problem. The numbers, indices and Omega logo applied had their gold plating dirty and quite dull, with careful cleaning they have recovered much of their original luster, in a still image it is not well appreciated but I assure you that now they play much more with the light creating much more shine and sparkle than before having cleaned them.
The only damage to the dial is, on the one hand, a small chip of the lacquer and paint located on the external perimeter of the dial and very close to the applied 11 o'clock index (exactly in the same place where the plexi had the breakage, so, although the dial/movement assembly should not move inside the case when it receives a blow, I wonder if both damages were related to the same incident ); and on the other hand, some very slight damage to the seconds subdial, which is barely perceptible to the eye, located very close to its central hole.
The hands, like all the gold-plated applied elements of the dial, were very dirty and dull; It has been necessary to clean them and they have also improved a lot. In the upper part of the image on the left you can see the hands that are still dirty, and in the lower part the hands that are already clean. I think the change is well visible despite the lack of focus in that image. In the photo on the right, the dial is already mounted on the movement and with the hands set (with that light and right at that angle you can see the grainy texture of the paint that I mentioned before and also its slightly pearly tone):
The only thing left to do was to look for an original gasket while I restoring the back, check the adjustment of the movement before assembling the "movement-dial-hands" set in the case and after all this choose a strap. I was already close to the finish line!!
To restore the steel back I took certain liberties, I decided that I was going to skip the step of respecting its current angles/facets, why? Well, for an aesthetic reason: for this case design, which includes both a plexi and a dome-shaped dial, I think that giving continuity to those shapes on the back of the case by also giving to the steel back a domed shape would be, not only more fluid and beautiful, but also much more coherent with the whole design of the watch; I think that the current design, more angular, in my opinion was clashing too much with the aesthetics of the rest of the watch. I also decided to eliminate a kind of engraving of concentric circles (not a radial brushing) that the steel back had and which, apart from being already very very degraded, I did not like at all, so I decided in favor of finishing the back smooth and mirror polished. What I was going to respect for sure on its external side was the legend "10K GF BEZ STEEL BACK" engraved on it.
In the image on the left, the steel back in process, with the desired domed shape already given, with the engraving of concentric circles already removed and with an initial polishing. In the image on the right the final result of the mirror polishing:
The mission of finding the gasket for the back was not an easy task for me either, I am not an Omega expert and it was the first time that I had to look for spare parts for an Omega watch case made in the USA; I searched hundreds of places but it seemed like I wouldn't be able to find it. I imagined, upon seeing the way the back closes on the case, that the gasket should be placed on the back (and not on the case) and that it should have a rectangular profile, that is, it should be a flat gasket, not a round gasket. But at Omega there are a multitude of different references of gaskets with very similar diameters depending on whether they are rigid or rubber, whether they are flat or round, etc, etc, a world of things. Finally, after a lot of research, I found, among the many international websites I visited, "Cousins UK" website where I was able to locate it by the reference number of the case 6294 (as you can see, underlined in red, at the end of the list of references in the image on the left). I had finally found the information I was looking for: the original Omega gasket for this watch had the reference 088.0010, it was a flat, rubber gasket, with a total diameter of 31.1mm and a thickness of 0.6mm. They had 24 in stock, so I ordered a pair. In the image on the right the gasket already lubricated and placed on the back.
And it's not that I'm going to get this watch very wet, rather I will avoid getting it wet as much as possible, but I consider that the gasket on the back is an essential seal to prevent moisture and dirt from entering the interior of the case and in the movement through that route again, in addition to avoiding problems such as possible fogging of the plexi when using the watch under certain circumstances or at given times.
What I have not found clear information about is the possible gasket that must be mounted on this specific crown model (it is a crown that I am more familiar with finding on Constellation models of the time). I don't know if in the American market it was common to mount these crowns on Seamaster models instead of the Naiad type, or if this crown was never originally mounted on Seamaster models there either (which would mean that someone changed the original Naiad for this "10 sides" one at some point in the life of the watch).
I also don't think it is something vital to change this crown for a Naiad since I´m going to avoid to wet the watch and since I suppose that the water-resistance ratio of this watch at that time wasn´t beyond the current equivalent of 3 atm, since obviously, no matter how Seamaster it is, this is far from being a diver's watch. Maybe here some of you could help me clarify some information regarding this crown. What I will probably do is look for a generic gasket of the appropriate diameter to introduce it in the crown and very narrow so that the stem can continue to fit into its housing and at the same time can do the job of the gasket that was originally installed.
On the finish line !!
The set of "Movement-dial-hands" already mounted in the case (so happy to see it mounted back in the case that I forgot to take off my work gloves to take the picture). As for the adjustment, I have not made any, these days that I have been checking it and it runs with a continuous +4/5 seconds/day so for now I prefer not to touch it at all (at least not until I use the watch for a while and see how it evolves):
ready and waiting straps:
One, in my humble opinion, beautiful handmade strap from Atelier Ferrer (Spanish manufacturer located in Barcelona) made of Teju leather in blue colour, and with it came the end of this rescue, this Seamaster will enjoy a second youth in my collection:
I hope you enjoyed the thread as much as I enjoyed restoring the watch. Thank you very much and MERRY CHRISTMAS to all !!
A little over a month ago I created a thread to clarify some doubts about a Seamaster that I wanted to restore (I call my restorations as "rescues") by myself.
Some members very kindly offered me their help (especially the colleague X350 XJR) to clarify the doubts I had about the watch (the watch is a model from the American market, I am from Spain so the model was not familiar to me and it generated those doubts in me).
In that thread I promised that I would update the progress of my "rescue", well, I didn't really update each step, but what I promised is a debt and now that I have finished restoring the watch, I would like to share with you the entire process (it will be a bit extensive, if you decide to continue reading, settle well, I hope the trip is to your liking):
I had been wanting to get a vintage Omega that had certain qualities and on which, if possible, I could carry out one of my "rescues". So, I found a vintage Seamaster on a Spanish trading platform, I couldn't resist its charm and I acquired it.
The description of the watch provided by the seller stated: "Omega Seamaster 1958; gold-plated case with screw-down steel back; 36mm diameter without crown; 491 movement with seconds at 6 o'clock", and a, literally "Very good condition and working, although a review is recommended", and I already imagined what the "Very good condition" thing was going to be like, which I took for granted due to the low price of this unit for a Seamaster of that characteristics and era.
So, I already had my Christmas self-gift as well as a new small rescue project!!! (although maybe I should say great project with everything I had to do to it in the end).
These are the photos published in the advertisement, and although we already know that the quality can be quite bad due to the compression that the buying and selling websites exert on these files, several things could be perceived from them: the gold plating appeared be quite scratched and even, if we looked closely, one could sense that the upper faces of the ends of the lugs were already peeled; It was also apparent that the crown, which according to the seller is the original of the watch (at least it is Omega signed/original and seems correct to me for that era, although I am more familiar with having seen them on Constellation models), had lost all of its gold plating; There were also several scratches on the plexi and what appeared to be a break on its external perimeter in the 11 o'clock area; In the same way, if we were to draw an imaginary straight line that went from the center of the axes of the hour and minute hands to the applied 4 o'clock index, we would find a round spot located halfway between the aforementioned elements; This stain, along with other smaller ones that could be seen on the subdial of the seconds hand, could not be known, from these photos, if they were on the dial or on the plexi; You could also distinguish what appeared to be dirt, or damage, on the dial at the lower end of the applied 1 o'clock index and on some other indexes. But perhaps the most noticeable of all was the misalignment suffered by the hands, since for the displayed time of approximately 10:10 hrs., the hour hand should have already surpassed the applied 10 o`clock index, which as we can see it has not done...and these are only some problems that this unit suffered from, as you will see next.
Once the watch arrived in my hands, oh, surprise!!, and not one, but several: the first of all is that this was not a gold-plated model, since between the lugs at the 6 hrs (and on the steel back) included the legend "10K G Filled", which, as all of you know, refers to a coating with gold foil and not to an electrolytic bath.
The fact of discovering that it was a 10K gold laminated model was the first clue that led me to think that this was not a model that was originally created for the European market, but for the American market. Then it was when I created the thread here to clarify my doubts, and it was when the information obtained about the cassist (Jonell) and the import brand "OXG" confirmed that it was a Seamaster model that was originally marketed in the U.S.A.
Although a gold laminate is much thicker than a plating, unfortunately in this case it was very damaged and everything that could be guessed in the photos of the advertisement became something worse when being able to see the watch in situ. Both of the sides/flanks of the case and lugs and in the upper area of the case (bezel`s area -although this case is made of one piece and does not have a removable bezel), the gold laminate showed significant damage; some scratches and dings were very deep. Furthermore, as seen in the photos of the advertisement, and despite being a gold laminated finish, not a plating, the ends of the upper faces of the lugs were already peeled, leaving the stainless steel from the case is made visible.
Although it is normal to expect some wear in a finish with these characteristics of a watch that is almost 70 years old and that has had its use, in this case it seems that instead of use what it received was complete abuse. Below I show you in more detail the state the watch really was in when it arrived:


Here, surrounded in red, you can see more clearly the areas at the end of the lugs and the area between them where the gold sheet has been completely worn away, leaving the stainless steel visible. The other two lugs are obviously just as bad. Also, surrounded in green, I show you the breakage of the plexi and the theoretically accumulated dirt at the applied 1 o`clock index. Both damages were already evident in the photos of the advertisement:
The steel back was no exception and, like the rest, it had multiple dents and the typical scratches, some very pronounced, caused by the tools used to open it throughout its life:

Once the external exploration of the watch was finished, it was now time to open it.
When I opened it, the first thing I noticed was that there was no gasket, neither on the steel back nor on the case; something that is usually a very bad sign, since the absence of a gasket usually indicates that dirt, or something worse: water, has been able to colonize the inside of the case and, therefore, also reach the movement. I wasn't too wrong, but first let's focus on the inside of the steel back.
The information engraved on the inside of the back, which you can see in the image, was not at all familiar to me as it was not a model for the European market, but at least now I could see the real references of the watch (since in the advertisement there was no were mentioned), we also see the "Jonell" logo (which I didn't know when I opened the case):
It was time to check the movement and, of course, more surprises: the watch movement is a 490, not a 491 as was advertised (although, as you know, the only difference between the two is that the 490 has 17 jewels while the 491 mounts 19 jewels).
Next thing was to try to know the manufacture year of the watch. From the movement´s serial number (14,675,542) comparing that number with different lists existing on the net, it looks like this watch would have been manufactured in 1954 or 1955.
But, in the documents published by Omega itself about the 490 - 491 movements, it is stated that these were not released until 1956.
So, what is the reason for this "contradiction" in the years?. Well, I have my theories, conjectures that I will not mention here and now since this thread is not for that. In any case, this watch is not a 1958 model as the seller advertised, but rather a model manufactured in a period between 1954 - 1956; and if to estimate a manufacture year of the watch I have to pay attention to certain information, I prefer to do it based on what Omega itself provides in the data sheets of these movements, so, leaving aside the dating that can be done by the movement's serial number from the lists found on various websites specialized in Omega, I will conclude that the watch was manufactured in 1956 as Omega itself indicates. (If anyone is interested in discussing the "contradictions" that I found searching for the possible year of manufacture of the watch, let me know in a comment and we will delve into the matter).
Oh !!, before I forget to tell you, the measurement of the case diameter was also wrong in the advertisement, since it measures 35mm without including the crown, not 36mm as advertised.
As I imagined, the absence of a gasket had allowed dirt to invade the interior of the case and reach the movement, although, thank God, there did not seem to be any traces of water. Of course, there were lots of dirtiness and fingerprints (...it seemed a perfect case for Horatio from CSI Miami...).
This is the condition of the inside of the case and the movement when I opened the watch:


I even found that surrounding the end of the rotor shaft there was a good colony of lichens living there.
Well, this is the "Very good condition and working, although a review is recommended" to which the seller was referring, thank goodness it was in "Very good condition", because I don't want to imagine what the watch could be like if it weren't like that. Although I have to say, it worked, indeed, it worked.
Of course, many people would have returned a watch in this condition, but since I wanted it to rescue it, since I still liked the watch model a lot and since I consider giving up in the face of a challenge like that to be cowardly, then ...it was time to put on work clothes!!!
The first thing to do would be to undertake cleaning and service to the movement.
As we all know, these were very good calibers for their time, starting with 470 this entire family of movements were the first to include a bidirectional loading rotor and came to replace the previous generation ones equipped with a bumper. They mounted Glucydur balance wheels and Nivarox hairsprings, which meant an increase in performance in terms of antimagnetism, durability, invariability in the face of temperature changes and absence of corrosion; Furthermore, as shown in the photos, these 490s already had a precise, and beautiful, gooseneck type adjustment to regulate it, etc, etc, etc.
Despite all the virtues of these movements, they could also cause problems, especially if periodic maintenance was not carried out, as we will see below.
Once I had dismantled the self-winding device from the rest of the movement, I found the first problem that could not be corrected with a simple cleaning and re-lubrication. This was the total wear of the reduction wheel of the aforementioned device, caused by its stop click that acts on it by its spring. And this is one of the problems that can arise in these movements if they are not reviewed regularly. I don't know when it was last serviced, but I'm sure it was a long, long time ago (...in a galaxy far, far away...) based on the state of the reduction wheel and the dirt accumulated on the rest of the components in general.
Here you can see, surrounded in red, the wheel that has suffered wear and, surrounded in green, the stop click that produces its erosion at the point where it occurs:
Here you can see in more detail the massive deterioration suffered by the wheel and which has ended up making it totally useless:
Once we remove the damaged wheel from its place, we can see the enormous trail of chips that has been created as the wheel has been consumed and that have accumulated both on the upper bridge of the automatic device and on the lower bridge of the same device. Chips that are very dangerous since they can, and usually do, migrate to the rest of the movement elements, potentially damaging them when introduced through them:
The same upper bridge of the automatic device after its complete cleaning and with the stop click already reassembled:
On this occasion, the vast trail of chips has not been located only in the bridges of the automatic device but a good part of them has fallen on the train wheel bridge and have also slipped through the gap between it and the crown wheel; Other chips have ended up on the cap of the crown wheel core and finally some more have landed on the double ratchet system that is mounted on this movements. All of this could have wreaked havoc on the movement in the medium term if this had been left alone and if I had continued to make regular use of the clock without first servicing it. Photos where you can see in more detail the chips over the elements I just described:

Fortunately, every component under the train wheel bridge was dirty but undamaged, as well as above and under the barrel bridge; nothing that couldn't be solved with a good cleaning. Here the escape wheel is out of its jewel, probably displaced from its place when lifting the train wheel bridge:
In the image on the left the movement is partially dismantled, at that point the mainspring had not yet been removed from the barrel, the double ratchet wheel system was not disassembled, the worn reduction wheel appears that had to be replaced, all the screws do not appear because they were receiving Its cleaning and other things that appear such as the plate, rotor and the different bridges had already received their cleaning. On the right, the double ratchet wheel system already disassembled and receiving its benzine bath prior to cleaning each element with a fine brush; If you look at that photo you can clearly see the traces of dirt that the pieces released when putting them in the bath. You can also see some small chips that we talked about before, which had already gotten between the two ratchet wheels, and which could have cause harmful effects of being trapped there:
After having cleaned everything thoroughly, greased and mounted the mainspring in its barrel, after lubricating the barrel seats, mounting bridges, lubricating all wheel jewels, balance jewels (from incabloc located on the plate), the crown wheel core seat and the double ratchet system, the assembly went perfectly:
Once the pallet fork and its bridge were assembled, having lubricated the jewels of its axis and jewels, it was the turn for the balance and hairspring with its bridge (both, the balance wheel and the hairspring seemed to be in perfect condition to my eye, even with everything I placed them on a conical support for its bridge and, after cleaning the hairspring with a couple of spray strokes with isopropyl alcohol, I left them covered for a couple of days so that gravity would act and correct any small irregularities that the hairpring could have; although I already said that at first glance it did not seem to have any), once the jewels at the top of the balance axis were lubricated (incabloc located on the bridge) and after a minimum spring load, the movement recover once again a healthy TIC TAC!!. It is always very gratifying to see how the movement regains its life again !!
Meanwhile, I had already received the spare part, new and original of course, for our reduction wheel (ref. 470-1432), so I could finish mounting the self-winding device:
As the French say: Et Voilà!!! The complete movement, once ready, was practically like new for being almost 70 years old and, above all, compared to the state it was in when it arrived to my hands:

Since the heart of the watch was beating in good health again, I could continue with the next element to rescue: the case.
It was going to be an arduous task, we all know that the case is another essential element of a watch, so while I turned it over with my hands, I kept asking myself: how am I going to recover a case of these characteristics, with the gold laminate this damaged, with dents and scratches so deep in multiple places and having the laminate completely peeled at the ends of the upper faces of the lugs (and in some other areas between them) where the stainless steel is already showing?
There was no point in considering measures that did not adhere to the reality of the situation; thinking about completely laminating the box again was totally unfeasible for several reasons, some of them obvious.
The most feasible solution was to perform an electroplating (electrolytic bath) that would uniformly recover the gold finish on the entire surface of the case, respecting, if possible, as much of the original gold lamination as possible.
And the truth is that theory sounded good in my head, but putting it into practice meant I had to clarify several doubts: I didn't know if on top of a 10K gold laminate I could apply 14K, 18K or 24K gold plating, or if on the contrary, they would have to be 10K gold baths to avoid any reaction on the piece; In the same way, I also did not know if the stainless steel needed any specific process to be able to be gold-plated since it was stainless steel that was protruding and had to be covered at the ends of the lugs. Those were my main doubts, but they were not the only ones, I had many more questions regarding electroplating processes since I had never done them before, nor did I have the slightest technical knowledge of the subject.
So there was nothing left but to study and get informed, and that's what I did. After a few days studying about the processes and techniques of electroplating, the different materials to be treated, the type of electrolytes to use, types of electrodes, voltages, amperages, etc., etc., in the end I was able to clarify all my doubts, including the main to do gold plating the case: now I knew that with a 10K gold foil I could make either 14K, 18K or 24K gold plating; My decision was to make the baths in pure gold, that is, using 24K yellow gold electrolyte.
In the same way I was able to know that, indeed, stainless steel normally requires prior acid activation to be able to be gold plated (although there are specific gold electrolytes to be able to gold plate stainless steel without it needing a prior activator, but they are more expensive electrolytes).
So taking advantage of this project and Christmas, I gave myself a power supply and the necessary gear to set up a small and humble homemade electroplating station, which is great for me both for this project as well as for future rescues.
Since I do not have pro machines or many other resources that professional watchmakers have in their workshops, I did the entire process of preparing the case for the electroplating by hand. Considering that gold is a relatively soft material, starting with roughing with fine grains moving on to refining with very fine grains. It was a task that took a lot of work, in these cases patience and perseverance are essential to carry out a task like this to a successful conclusion.As I already knew, some scratches and dents in some areas of the case flanks, lug flanks and top of the case (bezel area) were so deep that it was necessary to supress practically the entire thickness of the gold laminate in those areas to be able to equate them before leaving a surface that is as refined as possible for polishing prior to degreasing before electroplating. In the rest of the case areas I simply refined the original gold lamination a little, that is, I tried to respect the original laminate in the areas I could.
Once the case was roughed, refined, mirror polished and degreased, it was then time to do the electroplating, it was the first time I had done one in my life, I carried it out in two phases with two different 24K yellow gold electrolytes:
- First, an initial phase carrying out baths with 24K gold electrolyte without additives.
- Second, a final phase carrying out baths with 24K gold electrolyte with cobalt additive, this generates a much harder gold coating thanks to the hardening factor created by cobalt as an additive, making gold baths with this electrolyte much more more resistant to scratches, abrasion and impacts, this is what is known as a "hard gold" finish.
The steel crown, which as we saw at the beginning of the thread had completely lost its plating, followed the same electroplating steps as the case. I also blued the stem after removing a little rust that it had in the threaded area near the crown.
Here the case after the first phase of electroplating using 24K gold electrolyte:


Here the result the case (and crown) after the second/final phase of electroplating using 24K gold electrolyte with cobalt additive ("hard gold"):


I calculate that with the total of the baths made in the two phases of electroplating, the thickness of the gold in the case is about 20 microns (which would be added to the thickness of the 10K gold foil in the areas of the case where it continues maintaining it).
It had taken me a lot of work to obtain a result like this, but I finally had the case ready and in the state in which I imagined it when the rescue began, so nice !!!
Now it was time to find and install new plexiglass.
It's a shame that the plexi that came mounted on the watch was broken. In the photo on the left I show you the break in more detail, since it seems to me to be the original plexi (or at least original, signed with the omega logo). In any case, you can't notice the break area to the touch, so I cleaned it (also its gold metal ring, which was quite dirty) and polished it a little because I don't want to throw it away, I'm going to save it in case anyone day I need it for an emergency.
Taking its measurements and looking for the reference of the case (something complicated for me as it is an American made case and It do not had references that were familiar to me) I have tried to find the appropriate crystal, it has not been entirely easy but finally I was able to find out the correct original Omega plexi for this case: the reference PX5000. I looked for a new spare part, I was able to find it so in a few days I had it at home as I show you in the image on the right:
The case with the new plexi already mounted. Everything goes perfect at this point !!
It was time to get on with the dial and hands.
Fortunately, the beautiful, domed dial of the watch is in fairly good condition for being around 70 years old. As with a previous rescue I performed on a 1970s Seiko, having a hunch, based on the ad photos, that the watch face was in good condition was one of the reasons I which I decided to buy it. If I had realized that the dial was in worse condition, I would not have bought this piece since the dial is another vital element of the watch and I do not have (at least not today) the experience or the tools necessary to restore one dial that is very damaged, in addition to the fact that we all know that sending a dial to a specialist to restore it is not something that is cheap (apart from the fact that I would lose the charm of the rest of the "rescue" by not having been able to restore it myself like the other parts).
Additionally, it was a joy to discover that it maintains its original finish and that all the sources/legends are the original ones!!, that is to say, that its good condition is not because it has been restored (many from this era are). The color is very pretty and goes from an off-white tone to a light gray tone, both slightly pearly tones, depending on how the light hits it. Also, depending on the type of light it receives, a certain grainy texture is perceived in the paint under the lacquer, which is not metallic (but which does remind us of the metallic paints that later came to the industry). The finish of the seconds subdial follows the widespread pattern, as far as subdial finishing is concerned, of concentric circles in relief, which creates a reflective effect characteristic of this type of finish that, in a certain way and at sight, it resemble the effect achieved with "sunburst" type finishes.
There is practically no damage: what I thought was a small scratch on one side of the applied Omega logo was simply a very fine textil fiber or hair that was adhered to the dial and that with great care (so as not to damage anything) I was able to remove it. All the stains/spots that I anticipated from the photos in the advertisement and that I did not know if they would be on the dial or on the plexi, were finally stains/spots located on the inner face of the plexi. The dirt that was applied at the 1 hr index (and some more) was simply that, dirt accumulated in those places, and I could remove it without problem. The numbers, indices and Omega logo applied had their gold plating dirty and quite dull, with careful cleaning they have recovered much of their original luster, in a still image it is not well appreciated but I assure you that now they play much more with the light creating much more shine and sparkle than before having cleaned them.
The only damage to the dial is, on the one hand, a small chip of the lacquer and paint located on the external perimeter of the dial and very close to the applied 11 o'clock index (exactly in the same place where the plexi had the breakage, so, although the dial/movement assembly should not move inside the case when it receives a blow, I wonder if both damages were related to the same incident ); and on the other hand, some very slight damage to the seconds subdial, which is barely perceptible to the eye, located very close to its central hole.
The hands, like all the gold-plated applied elements of the dial, were very dirty and dull; It has been necessary to clean them and they have also improved a lot. In the upper part of the image on the left you can see the hands that are still dirty, and in the lower part the hands that are already clean. I think the change is well visible despite the lack of focus in that image. In the photo on the right, the dial is already mounted on the movement and with the hands set (with that light and right at that angle you can see the grainy texture of the paint that I mentioned before and also its slightly pearly tone):
The only thing left to do was to look for an original gasket while I restoring the back, check the adjustment of the movement before assembling the "movement-dial-hands" set in the case and after all this choose a strap. I was already close to the finish line!!
To restore the steel back I took certain liberties, I decided that I was going to skip the step of respecting its current angles/facets, why? Well, for an aesthetic reason: for this case design, which includes both a plexi and a dome-shaped dial, I think that giving continuity to those shapes on the back of the case by also giving to the steel back a domed shape would be, not only more fluid and beautiful, but also much more coherent with the whole design of the watch; I think that the current design, more angular, in my opinion was clashing too much with the aesthetics of the rest of the watch. I also decided to eliminate a kind of engraving of concentric circles (not a radial brushing) that the steel back had and which, apart from being already very very degraded, I did not like at all, so I decided in favor of finishing the back smooth and mirror polished. What I was going to respect for sure on its external side was the legend "10K GF BEZ STEEL BACK" engraved on it.
In the image on the left, the steel back in process, with the desired domed shape already given, with the engraving of concentric circles already removed and with an initial polishing. In the image on the right the final result of the mirror polishing:
The mission of finding the gasket for the back was not an easy task for me either, I am not an Omega expert and it was the first time that I had to look for spare parts for an Omega watch case made in the USA; I searched hundreds of places but it seemed like I wouldn't be able to find it. I imagined, upon seeing the way the back closes on the case, that the gasket should be placed on the back (and not on the case) and that it should have a rectangular profile, that is, it should be a flat gasket, not a round gasket. But at Omega there are a multitude of different references of gaskets with very similar diameters depending on whether they are rigid or rubber, whether they are flat or round, etc, etc, a world of things. Finally, after a lot of research, I found, among the many international websites I visited, "Cousins UK" website where I was able to locate it by the reference number of the case 6294 (as you can see, underlined in red, at the end of the list of references in the image on the left). I had finally found the information I was looking for: the original Omega gasket for this watch had the reference 088.0010, it was a flat, rubber gasket, with a total diameter of 31.1mm and a thickness of 0.6mm. They had 24 in stock, so I ordered a pair. In the image on the right the gasket already lubricated and placed on the back.
And it's not that I'm going to get this watch very wet, rather I will avoid getting it wet as much as possible, but I consider that the gasket on the back is an essential seal to prevent moisture and dirt from entering the interior of the case and in the movement through that route again, in addition to avoiding problems such as possible fogging of the plexi when using the watch under certain circumstances or at given times.
What I have not found clear information about is the possible gasket that must be mounted on this specific crown model (it is a crown that I am more familiar with finding on Constellation models of the time). I don't know if in the American market it was common to mount these crowns on Seamaster models instead of the Naiad type, or if this crown was never originally mounted on Seamaster models there either (which would mean that someone changed the original Naiad for this "10 sides" one at some point in the life of the watch).
I also don't think it is something vital to change this crown for a Naiad since I´m going to avoid to wet the watch and since I suppose that the water-resistance ratio of this watch at that time wasn´t beyond the current equivalent of 3 atm, since obviously, no matter how Seamaster it is, this is far from being a diver's watch. Maybe here some of you could help me clarify some information regarding this crown. What I will probably do is look for a generic gasket of the appropriate diameter to introduce it in the crown and very narrow so that the stem can continue to fit into its housing and at the same time can do the job of the gasket that was originally installed.
On the finish line !!
The set of "Movement-dial-hands" already mounted in the case (so happy to see it mounted back in the case that I forgot to take off my work gloves to take the picture). As for the adjustment, I have not made any, these days that I have been checking it and it runs with a continuous +4/5 seconds/day so for now I prefer not to touch it at all (at least not until I use the watch for a while and see how it evolves):
ready and waiting straps:
One, in my humble opinion, beautiful handmade strap from Atelier Ferrer (Spanish manufacturer located in Barcelona) made of Teju leather in blue colour, and with it came the end of this rescue, this Seamaster will enjoy a second youth in my collection:
I hope you enjoyed the thread as much as I enjoyed restoring the watch. Thank you very much and MERRY CHRISTMAS to all !!

Wonderful story, and beautiful result. Read with coffee on New Year's Eve morning!
amazing work! happy new year!!
Incredible post, I thoroughly enjoyed it! I wish I had the space where I am to do this kind of work, but I’m happy to experience it through you and to learn along the way
Beautiful. Simply beautiful.
I had a watch case rechromed years back. It was fiddly getting the caseback and crystal to fit again due to the thickness of the plating.
Did you have any such problems?